To Stop a War
To Stop a War is scenario five of Act II: Shadow in The WarChiefs campaign, set in 1876. The player begins on one side of a conflict and the story later changes the player’s allegiance. Its two-stage objective makes the side switch central to the mission: the first target belongs to the opening phase, and the second appears after control changes.
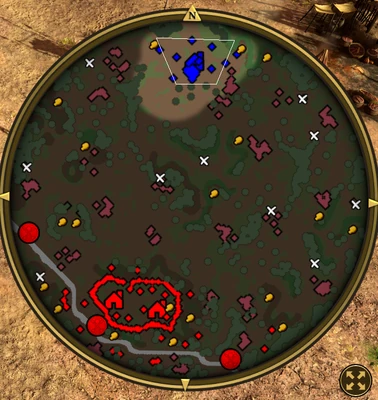
Scenario setting & objectives
Before the side switch, destroy the Lakota Town Center; after the switch, destroy the Fort’s Command Post. Reclaiming all three Trading Posts is optional. Because the main target changes with the story, keep checking the objective list and do not continue attacking the first faction after the transition.
Mission approach
Build enough force to finish the first objective while preserving units for the next phase. Secure the Trading Posts when doing so will not delay the side switch or leave the army unable to reach the new target. Once the transition occurs, regroup, confirm the updated map objective and move against the Command Post.
Scenario setup and objective switch
To Stop a War is the fifth scenario in Act II: Shadow of The WarChiefs. Before Definitive Edition it was called Turning Point. The mission is notable because the player's side changes during play. In the original opening, Chayton Black and a small group of Wakina Riflemen begin near Holme's unfinished southern fort. The player is asked to protect American Settlers as they gather Wood, while Lakota forces attack them. The first primary objective is to destroy the Lakota Town Center. Once Holme's betrayal is revealed and the sides change, the objective becomes destroying the fort's Command Post. The secondary objective is to reclaim all three Trading Posts along the southern Trade Route. Definitive Edition skips the opening defense stage: the fort is already complete, and Chayton begins in command of a Lakota settlement at the north edge. The objective and character allegiance should therefore be read in the context of the edition being played.
Starting position and map layout
The Black Family Estate player begins with Chayton, several Wakina Riflemen, a War Hut near the southern fort, and three Trading Posts placed along the Trade Route south of the map. The American settlement contains two Mills, two Town Centers, a Saloon that functions as the fort, Holme, and Settlers gathering Wood. In the original version, walls and towers gradually appear as the fort is completed. The Lakota village and Town Center lie to the north; the southern route and fort create a long distance between the two objectives. The map resembles the Great Plains, with open ground, forested gathering areas, Bison that become unsafe when enemy raids reach them, and Silver mines to the west and east. The Trading Posts are valuable both for the secondary objective and for map presence, but moving units between them can expose the small starting force. Use the initial vision and route layout to decide which site can be reclaimed safely.
First phase and changing allegiance
In the original opening, protect the woodcutters while Holme's fort is under construction. Lakota attacks consist mainly of Wakina Riflemen and a few War Clubs. Establish a defensive screen around the Settlers and train Skirmishers to answer the incoming infantry; do not chase raiders so far north that the workers are left exposed. Once the first objective to destroy the Lakota Town Center is active, build the force needed for a northern push and secure the route as the army advances. The story then reveals that Holme is connected to the Hole in the Wall gang and has broken the truce. Chayton sides with his Lakota relatives, the American units become enemies, and control of the fort changes. The enemy composition now includes Skirmishers and Rockets. Holme disappears when the Americans take over the fort, so the target is the Command Post rather than an individual hero. The shift makes the same map and infrastructure serve opposite purposes across the mission.
Approach to the primary objectives
The Lakota Town Center is a fixed target and should be attacked after the player's force can withstand repeated Wakina Riflemen and War Club assaults. Skirmishers provide useful ranged answers to infantry, while the War Hut supplies reinforcements close to the southern base. Reclaiming Trading Posts along the way can improve control of the Trade Route, but the three-post secondary objective should not split the army during a dangerous attack. After the side switch, prepare for a fortified position with walls, towers, Skirmishers, and Rockets. Bring siege capable units and protect them with a screen; sending light infantry directly into a walled fort exposes them to defensive fire and Rocket volleys. The Command Post is the required target. Clear or distract the defenders, then concentrate damage on the objective instead of spending time razing every building. If the army must cross open ground, use the forest and terrain to approach without leaving the siege units isolated.
Resource and reinforcement management
Wood is a key resource in the first phase because American Settlers gather it to complete the fort and the player may need to produce buildings or units at the same time. Bison are a tempting Food source, but enemy raids can make the northern hunting area dangerous. The western and eastern Silver mines offer alternatives for Coin when the central route is contested. Keep the starting Trading Posts protected if possible, but do not sacrifice Chayton or the main army to secure all three while the enemy is attacking. In Definitive Edition, the skipped opening means the player starts later in the story with an already built fort and different control of the northern village; the early Settler defense advice applies only to the original sequence. This version distinction changes the opening priorities even though the primary target later changes in the same narrative.
Secondary objective and side switching
Reclaiming all three Trading Posts is optional but requires control of the entire southern route, so complete it when the army can spare units without delaying the Command Post assault. A small force can secure a post behind the front while the main army deals with the active primary objective. Keep track of which player owns each post after the allegiance change; the same structures may be in hostile territory once the American fort becomes the enemy base. The narrative transition changes both ownership and target priorities, and the original opening stage is absent in Definitive Edition. Save the mission between stages only if the game mode allows it, and do not assume that a tactic based on protecting the first group of Settlers applies to the DE start.
The side switch changes the Town Center target
The fifth Act II: Shadow scenario changes allegiance during play. Before Chayton switches sides, destroy the Lakota Town Center; after the switch, the objective becomes the Fort’s Command Post. Reclaiming all three Trading Posts is optional and can strengthen control of the route, but plan the transition before moving the entire army away from the fort. The story follows Chayton’s decision to join the Lakota cause after initially helping Sheriff Holme establish his fort. Once the side changes, reassess the map and target rather than continuing the earlier attack plan. Keep units together through the transition so the player can respond to the new objective immediately. The original release called the scenario Turning Point; Definitive Edition uses To Stop a War.