Valley Forge
Valley Forge is the sixth scenario of Act I: Fire in The WarChiefs, set during the Continental Army’s winter encampment of 1777–1778. The mission first asks the player to establish a settlement and gather supplies, then send the force out to attack the British position at Barren Hill.
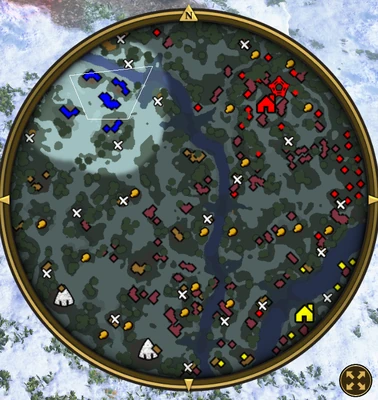
Scenario setting & objectives
Build six Huts inside the camp, meet the scenario’s Food-gathering requirement, then destroy the British Fort on Barren Hill. Optional goals include removing an Outpost to open a pass and returning a Food Wagon to Valley Forge. The Baker can train one Food Wagon for 100 Coin; the wagon must reach camp to deliver its 1,000 Food, so it is a vulnerable escort objective.
Mission approach
Keep early workers focused on the stated camp and Food goals while retaining enough defenders to protect construction. Before moving to Barren Hill, secure the route and bring the force needed for the Fort. Escort the Food Wagon along a scouted path, and take the Outpost only when opening the pass helps the main attack.
Campaign setting and opening
Valley Forge is the sixth scenario of Act I: Fire in The WarChiefs. The mission is set in the winter encampment of 1777–1778 after the colonial losses at Brandywine and Germantown. Nathaniel Black and General Washington begin with seven Colonial Militia and three tents in the north, near a partially frozen river. The opening objective is to build six huts in the camp. The force must also gather Food and eventually destroy the British Fort. The story emphasizes cold and shortages: units that leave the campfire’s protective area take damage, so exploration and gathering have to be planned around warmth rather than ordinary map control.
Cold damage and campfires
Units lose health when they move too far from a campfire in the freezing map. Keep troops close to the fire while the camp develops, and bring damaged survivors back to a fire to recover. This changes how the player should approach treasures and resource crates: send units in pairs or short trips, then return before the cold causes losses. Settlers are important for completing the six huts and gathering Food, so protect them and avoid exposing them to both British patrols and cold damage. Unlike Crossing the Delaware, the winter conditions actively restrict how far a force can travel from shelter.
Build the camp before expanding
The six-hut requirement is an early milestone. Gather nearby resource crates with the Colonial Militia and use the workers carefully, since the starting economy is small. British pairs attack while the player searches for resources and treasures, so keep a defensive group near the camp and avoid sending every soldier away. General Washington and Nathaniel can clear the treasure guarded by three Black Bears; the treasure provides a Settler, and that worker is especially useful because Settlers do not take cold damage. Use the extra worker to strengthen the economy while the original soldiers remain close enough to fires and the camp.
Bakers and the winter supply mission
Two Bakers on the map are initially owned by the allied Americans and later come under player control during the scenario. Their role is tied to the supply and survival objectives; ownership returns after the winter sequence. The American ally also has a small settlement southeast of the map, but its age advancement does not determine the player’s objective. Use the Bakers and camp infrastructure to stabilize the force before attempting the British Fort. The mission is not simply a base race: protecting units from cold, collecting supplies and surviving repeated attacks shape the route to victory.
British opposition and fort assault
The British deploy a varied force that includes Grenadiers, Musketeers, Falconets and several forms of Cavalry. Keep Colonial Militia and other defenders together so the fort’s supporting army cannot isolate them. Use Washington and Nathaniel for important targets, but do not leave them outside fire protection for long. Once the camp has the required huts and enough Food, build a force capable of handling both artillery and the British frontline. Attack the Fort with support and protect the workers who maintain the settlement. The mission’s cold rule remains relevant during the assault, so establish a route between campfires rather than marching the entire force across the map at once.
Objective sequence and supply
The mission begins by requiring six huts, then asks the player to gather Food and destroy the British Fort. Use the nearby resource crates and treasure opportunities to establish the camp without moving the whole force beyond the fires. British patrols arrive in small groups during the search, so keep defenders available while workers build. The Settler treasure guarded by three Black Bears is valuable because the rescued Settler does not suffer cold damage and can help the camp economy. Secure the objective sequence before trying to cross the map in force.
Washington, Nathaniel and unit health
Nathaniel Black and General Washington can defeat the nearby Black Bear treasure guards and later lead the force against the British. They are valuable heroes, but cold damage affects units that move too far from campfires. Watch their health and return them to shelter if they take significant damage; a hero lost while scouting can leave the small starting force without leadership. Use Colonial Militia to gather distant crates in short trips and bring injured troops back to a fire before resuming the objective.
Difficulty and the allied settlement
The winter hardship and enemy pressure make the mission’s pacing important. The player’s starting settlement is small, while the allied Americans control two Bakers that later come under player control and then return after the winter. A separate allied town to the southeast may age up but does not determine mission success. Do not rely on that AI settlement to complete the huts or destroy the Fort. Build the required camp with your own workers, use the temporary Baker control when it becomes available, and maintain enough units near the fires to protect the base.
A different rhythm from a normal skirmish
Because the campfire limits exploration and health recovery, prioritize safe, short movements. The objective is to sustain the small colonial force through the winter and prepare the final assault, rather than expand across the entire map early.
Keep fires on the route to the objective
Place campfires so the force can return to shelter between resource trips. This creates a safe movement rhythm for the huts, Food gathering and later British Fort assault, and reduces losses from exposure.
Return wounded units to shelter
A damaged unit should recover at a campfire before the next resource trip or fight. Keeping the force healthy reduces losses while the player builds huts and prepares the final assault.
Protect the six-hut camp
The huts are the first objective and the base for later survival. Keep enough troops at camp to answer British patrols while the workers gather the resources needed to finish construction.
Build shelter and prepare for the Barren Hill attack
The Valley Forge scenario is based on Washington’s winter encampment of 1777–1778. Its objectives require six Huts inside the camp, a gathering task and the destruction of the British Fort on Barren Hill. Establish the camp layout first so the Huts are placed within the required area, then keep workers protected while the army prepares to move. The optional Outpost can open the pass, changing the route toward the British position; the Food Wagon is another recovery objective and should be escorted back rather than abandoned after it is found. Do not send the whole army toward Barren Hill before the camp is ready, because the construction objective and the final assault demand different forces. Leave a small guard near the camp and use the main army for the Fort. The source’s gathering objective is incomplete in the captured data, so follow the in-game objective display for its exact amount.