Crossing the Delaware
Crossing the Delaware is the fourth scenario of Act I: Fire in The WarChiefs, set in 1776 during Washington’s surprise campaign against the Hessian force at Trenton. The mission turns the river crossing into a route-planning problem: establish the approach, strike the enemy positions and continue into the British rear.
Scenario setting & objectives
The required sequence is to cross the Delaware and destroy the Hessian tents, light signal fires at two flagged locations, defeat Cornwallis’ rear guard at Princeton, then destroy the Capitol in Trenton. Optional goals target British prison ships and a cannon at the Hessian Garrison. The signal fires and crossing open the route for the later attacks, so keep a force ready to move inland after the first objective.
Mission approach
Scout the river approach before splitting your force. Clear the Hessian position, then use the signal-fire locations as waypoints and keep enough troops together for the Princeton and Trenton assaults. The optional ship and cannon objectives can wait until the route and main force are secure.
Scenario setting and objective sequence
Crossing the Delaware is the fourth mission of Act I: Fire in The WarChiefs. Set during the winter of 1776, it follows George Washington and Nathaniel Black as the Colonials attempt to strike the Hessian winter quarters at Trenton. Its primary tasks unfold in order: cross the Delaware, destroy the Hessian tents, light Signal Fires at two marked sites, defeat Cornwallis' rear guard at Princeton, and finally destroy the British Capitol in Trenton. The mission begins as a small-force operation and changes into a larger battle after the fires are lit. The opening cinematic explains the Colonials' retreat and Washington's command, while the snowy map and frozen river branches shape how the force approaches its targets.
Starting units and river crossing
The player starts west of the Delaware with Nathaniel Black, General Washington, Colonial Militia and three Flat-bottomed Boats. The boats provide both scouting and transport, so use them to inspect crossings and move the small force without walking into Hessian patrols. One route crosses directly toward Trenton; another reaches a Falconet near the southern shore after passing enemy towers. Capturing the gun can help against the Grenadiers guarding the tents, but it requires a careful approach. Preserve the heroes and militia through the first encounter: the mission initially provides limited reinforcements, and the later British counterattack is much larger than the Hessian patrol.
Destroying the Hessian tents
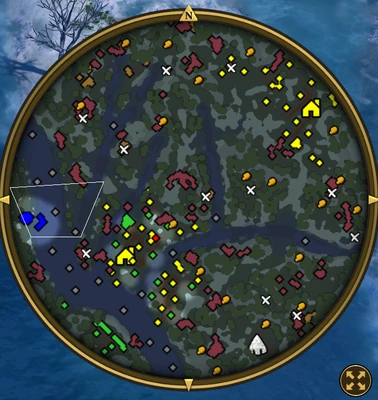
Trenton contains ten Hessian tents guarded by a clockwise Grenadier patrol and additional defenders near individual targets. The Grenadiers can be dangerous to Colonial Militia, so avoid fighting the entire patrol with the militia alone. Use Washington and Nathaniel to absorb pressure, bring the captured Falconet if available, and exploit Nathaniel's special ability against isolated defenders. Move from one tent to the next while the patrol is elsewhere rather than drawing the whole camp at once. The first stage is complete when all tents are destroyed. At that point the immediate Hessian guard pressure changes, opening room to reach the two flagged Signal Fire locations and prepare for the next phase.
Secondary objectives and rescue opportunities
Two optional objectives reward 500 XP each: destroy the British prison ships and capture the cannon at the Hessian Garrison. The ships lie toward the south and are guarded by British Musketeers; destroying them releases Colonial Militia who join the player. The western-side Hessian encampment contains a Falconet that can be captured and used against the tents. Additional exploration can reveal a Huron settlement, a Coureur des Bois in need of rescue, supply crates and treasures. These opportunities help compensate for the small starting force, but the map remains dangerous. Use the Flat-bottomed Boats to explore in short moves and return to the main army rather than letting a small detachment become trapped away from the river crossing.
Light the fires and prepare for the counterattack
After the tents are destroyed, Washington asks Nathaniel to build and light a Signal Fire at each of the two marked locations. Once both are lit, Cornwallis responds by sending a powerful army south from Princeton, with Falconets, Royal Cannons, Musketeers and Jaegers. The scenario also sends reinforcements to the western riverbank while Nathaniel works, including Colonial Militia and a Surgeon. Transport the new group across with the boats and merge it with the surviving force. Keep the Surgeon away from the front during the fight; the unit is valuable support and can be killed quickly if caught by the rear guard. Do not activate the fires before the army and boats are positioned for the next stage.
Take Princeton and secure the economy
Cornwallis' force leaves a smaller rear guard in Princeton. Defeat it to bring the Princeton colonists to the player's side; their Villagers then gather Food, Wood and Coin for the final push. A small group of British Jaegers may attack the settlement after it joins, so leave defenders nearby. This economic relief marks the transition from the stealth-like opening to a standard army-building phase. Use shipments for Colonial Militia and Kanya Horsemen if the force needs quick reinforcement, and put Villagers on the Community Plaza's War Ceremony when that is more valuable than continuing to gather. Keep a mobile reserve at Princeton so a returning British group cannot disrupt the economy while the main army moves south.
Build a force for the Trenton assault
The final Capitol is in Trenton, and the British defenses include Musketeers, Skirmishers, Falconets and a small number of Jaegers. A mixed force is safer than sending only Heavy Infantry into artillery fire. One suggested composition uses Tomahawks for affordable mass, Kanya Horsemen for mobility and Falconets to attack the Capitol and enemy guns. The exact numbers depend on losses and available shipments; gather a force large enough to withstand the defenders before crossing the shallow river branch. Keep several Kanya Horsemen at Princeton to delay counterattacks, then take the main group directly toward the objective. The mission is won by destroying the Capitol, so it can be more effective to focus the building than to pursue every retreating defender.
Route, terrain and victory conditions
Several river channels divide the map, and the two main cities sit on the eastern landmass. Trenton lies near the Delaware's east bank; Princeton is farther inland. Flat-bottomed Boats can carry troops around deeper channels, while shallow branches offer a later land route for the final attack. In winter, snow-covered terrain and partly frozen water create a distinct visual and tactical environment. The first stage rewards patience and avoiding patrols; after Cornwallis moves, the mission rewards regrouping, protecting the Princeton economy and using artillery against the Capitol. Destroying the Capitol in Trenton completes the mission even if enemy forces remain elsewhere. Keeping the force focused on the ordered objectives prevents unnecessary losses and makes the final assault more manageable.
Protect the recovery window
After Princeton joins, use the new Villagers to build a stable resource base while a small guard watches for the British return. The Surgeon should stay behind the firing line, and the boats can still move reinforcements between banks if the attack route changes. Once the force is assembled, cross the shallow branch toward Trenton and keep the Capitol as the main target. The sequence works best when the player secures each transition before triggering the next: clear the tents, light both fires with a prepared force, take Princeton, then commit to the final assault.
Light the fires and strike Trenton from the river
The fourth Act I: Fire scenario is based on Washington’s 1776 crossing and surprise attack at Trenton. Cross the Delaware, destroy the Hessian tents, light signal fires at two marked locations, defeat Cornwallis’ rear guard at Princeton and destroy his Capitol in Trenton. The optional prison ships and captured Hessian cannon can strengthen the attack, but the river crossing and signal fires define the route. Keep the force together during the crossing, then divide only enough units to light both fires without leaving either group exposed. Destroying the rear guard opens the advance toward the Capitol. Preserve siege support for the final building rather than spending it on optional targets. The mission’s objective order reflects a surprise operation through several positions, so move promptly once each phase is secure.