Breed's Hill
Breed’s Hill is the third scenario in Act I: Fire in The WarChiefs, set during the 1775 Battle of Bunker Hill. The Black Family Estate force must protect the redoubt, so success depends on keeping the defensive position intact while repelling the assault.
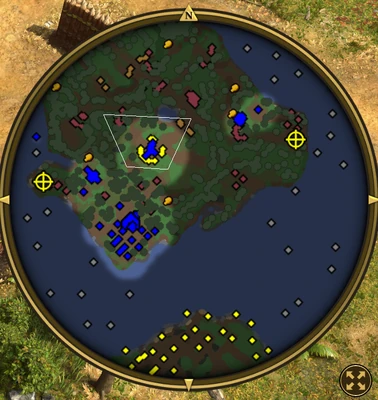
Scenario setting & objectives
The sole primary objective is to protect the redoubt on Breed’s Hill. Keep a defensive force within reach of the position, watch the approaches and use reinforcements to intercept attackers before they can concentrate on the redoubt. Optional fighting away from the hill is secondary to the structure’s survival.
Mission approach
Keep enough units near the redoubt to respond as attackers arrive. If the position is stable, use the remaining force to intercept threats before they can reach it rather than chasing them far across the map.
Mission premise and survival objective
Breed's Hill is the third scenario of Act I: Fire in The WarChiefs. The mission is inspired by the 1775 Battle of Bunker Hill and follows Nathaniel Black after the Haudenosaunee Confederacy breaks apart. He joins the Colonial Militia and is assigned to defend a redoubt against British troops landing from Boston. The primary objective is to protect the redoubt until the 20-minute countdown ends. This is a defensive mission with pressure on several fronts, not a race to destroy the enemy base. The player must hold the central position while watching Charlestown, the western Fixed Gun, the smaller eastern settlement and the shore where British ships land troops.
Starting base and forces
The player controls Charlestown and a redoubt near the center of the main island. The town includes an ammunition storehouse, twelve Villagers, a Mill, Estate, Livestock Pen, Houses and several military buildings. A smaller village to the north has another Mill and six Villagers. Nathaniel Black begins at the redoubt with five Forest Prowlers and five Colonial Militia. A War Hut, Church, Artillery Foundry, Saloon and Market are also available in the starting settlement. Assign idle Villagers to gather immediately, with Food prioritized if the plan relies on training Colonial Militia. Market improvements can improve the gathering rate and make it easier to maintain production through the long defense.
Prepare before the British attack
The countdown begins at the start, so use the opening minutes to balance resources, build reinforcements and position defenders. The source strategy recommends an early Farm Travois shipment to improve Food gathering and a Colonial Militia shipment to strengthen the first defense. Around the 16-minute mark, a warning signals that the British are preparing to attack Boston Harbor. Send a substantial force to the redoubt and leave another group near the western Fixed Gun. Forest Prowlers can use their ranged attack to support the Militia, while Nathaniel's special ability helps remove dangerous attackers. Keep production buildings working and avoid spending every unit on a distant skirmish.
Redoubt and fixed gun priorities
The redoubt is the primary objective, but the two Fixed Guns create important secondary fronts. The western gun is very close to the player's town; if the British capture it, Charlestown is at risk. Protect it with nearby troops and use Canoes from the Dock to help defend the coastal approach. The eastern Fixed Gun can be ignored if necessary, because its loss threatens only a secondary outpost and Villagers can gather elsewhere. However, holding it gives the player a way to fire on British Caravels passing nearby. The western gun should receive the stronger defense, while the eastern position can be treated as an opportunity rather than a condition of victory.
British landing waves and naval pressure
Brigadier Pigot's Caravels repeatedly bring Musketeers and a smaller number of Skirmishers ashore southeast of the island, where they move toward the redoubt. General Howe sends troops to both the southeast and west, and his forces attempt to capture the Fixed Guns before advancing on the objective. British Galleons also attack Charlestown from the water. Once the first enemy brigade has been defeated, the map opens up and the player can use the Fixed Guns against passing Caravels. Garrisoning Villagers in the Town Center can help drive away ships that approach the settlement, while Canoes can patrol near the western gun and intercept naval threats.
Use the army and shoreline together
The British can pressure both land and water, so one unit type alone is not enough. Colonial Militia and Forest Prowlers can hold the redoubt, while Kanya Horsemen or Tomahawks can reinforce the eastern Fixed Gun against an incoming infantry group. Canoes add a mobile response to Caravels and can screen the coast near the western gun. If the western position is threatened, shift Villagers to fight only as a last resort and keep the main force close enough to protect Charlestown. A Dock and a growing Canoe fleet can help turn the water into a defended approach, but land defenders are still needed because British units continue to disembark.
Alternative defensive construction
A more naval approach begins by assigning Villagers to Wood, building a Dock on the southeast shore and producing many Canoes. War Huts near both Fixed Guns can provide local military production; repair them when British attacks damage the structures. The Fixed Guns can then target landing forces, while the Canoes intercept ships that threaten the coast. Keep enough Colonial Militia around the redoubt and use a western War Hut to generate additional defenders. This strategy trades early Food production for a stronger naval screen, so it works best when the player can maintain enough land units through Home City shipments and local production.
Stealth defense differs by edition
Forest Prowlers can make a stealth-based defense possible because the objective only requires allied units to remain inside the redoubt. In The WarChiefs, stealth units can remain hidden even when enemy units are very close, which makes it easier to leave them in place while the rest of the army defends elsewhere. Definitive Edition deactivates stealth when enemies approach too closely, so the same tactic requires careful positioning and may fail if a British wave reaches the redoubt. Treat this as a version-specific option, not a universal way to skip the defense. The reliable approach is to maintain a visible garrison and protect the nearby Fixed Guns.
Terrain, resources and completion
The main island is a broad peninsula with sea on three sides and a smaller landmass to the south. Trees are plentiful, Silver Mines are scattered near the settlements, and Berry Bushes are limited near the coast. Deer are found farther north but are inconvenient to reach, and the fishery is dangerous while British ships patrol the water. The mission ends when the 20-minute timer expires with the redoubt still held. Capturing the Fixed Guns and sinking ships can make the defense easier, but neither replaces the central requirement. Balance Wood for Canoes and buildings against Food for Militia, and move units back to the redoubt before the final waves arrive.
Hold the central position
Keep a visible garrison at the redoubt through the last minutes of the countdown. The fixed guns and Canoes can reduce pressure elsewhere, but the objective is only secure while allied units remain in the defensive position.
Protect the redoubt during the Bunker Hill battle
Breed’s Hill is the third Act I: Fire scenario and is based on the Battle of Bunker Hill on June 17, 1775, a costly British victory. The required goal is to protect the redoubt, so the player’s priority is to keep defenders close to the position rather than pursue every enemy unit. Use terrain and the redoubt’s approach to focus fire on attackers, and replace losses before the next push reaches the objective. Keep a mobile reserve behind the line so it can respond to whichever approach becomes threatened. The historical name Breed’s Hill is retained for the scenario even though the battle is widely known as Bunker Hill. A successful defense depends on maintaining the position through the assault; defeating units that are not threatening it does not substitute for preserving the redoubt.