Grito de Dolores
Grito de Dolores is a Mexican historical battle about Miguel Hidalgo’s 1810 call to rise against Spanish rule. In the scenario, local towns become the player’s foothold for an uprising that must ultimately destroy both Spanish bases in the southeastern mountains.
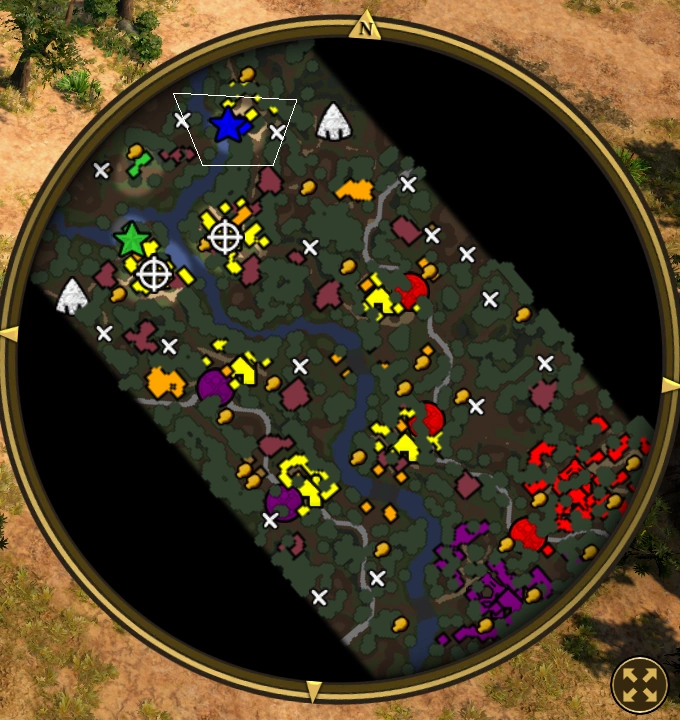
Setting & objective
Liberate towns to take control of their buildings, free the remaining towns and attack both southeastern Spanish bases. Stealing Spanish Food is optional; it can help the economy but does not replace the two base objectives.
How to approach it
Use liberated buildings to establish a safe production area before marching toward the mountains. Prepare for two fortified targets and keep the force supplied between them; complete the optional Food theft when it does not delay the main attack.
Scenario premise and opening position
Grito de Dolores is a Definitive Edition Historical Battle released with the Mexican civilization content. Set in 1810, it centers on Miguel Hidalgo’s call to revolt against Spanish authority. The scenario begins in the Exploration Age and can progress as far as the Imperial Age, with a population limit of 200. The player starts as the Northern Revolutionary Army with El Padre and 22 Insurgentes in a friendly town. There are no starting resources or Settlers: the first task is to liberate occupied settlements and regain an economy. A Southern Revolutionary Army led by a Mexican General is an ally operating across the river. The primary objectives are to liberate the towns and destroy two Spanish bases in the southeastern mountains; stealing Spanish Food crates is an optional objective.
Liberate towns before attacking the forts
The first Spanish-held town lies to the south. An Outpost and a small mixed garrison defend it, including cavalry and infantry. Use the starting force together rather than splitting the Insurgentes into small groups, and remove the defenders before taking the settlement. Liberating the town grants control of its buildings and access to Settlers, which is the turning point for the economy. Start Villager production and use the available Hacienda system to gather resources. The next town farther south has a larger force, especially cavalry, but capturing it opens a shallow river crossing and unlocks Stable construction. After securing this route, the player can connect with the southern ally, reach treasures and trading sites, and choose whether to attack the remaining town on the home bank or cooperate on the opposite side.
Economy, optional supplies and technology
The optional Spanish food stores can provide a large economic boost: five crates contain 500 Food apiece, for 2,500 Food total. The store area is more heavily defended than the first town, so attacking immediately with the original Insurgentes risks losing the only army before the economy is established. Build up after the first liberation and bring a larger force before sending Settlers to collect the crates. The Cathedral can research Cry of Dolores, which grants El Padre an ability that rapidly heals nearby friendly units. Activate it when a substantial group has taken damage and keep the hero protected while healing. Home City shipments can provide resources, units, artillery or a Factory Wagon; they are particularly useful because regular Artillery Foundry access comes later in the mission. Check the scenario’s available cards, since this battle’s deck is not the same as a standard Mexican skirmish deck.
Building a force for the mountain bases
The later Spanish towns and bases field stronger resistance, including Falconets and fortified positions. Do not send cavalry directly into the main infantry screen; use it to approach from the side and attack enemy guns, while durable infantry holds the front. Add artillery from shipments or the Factory when available, and protect it from cavalry with a screen. Capturing the final town on the player’s side unlocks an Artillery Foundry, opening regular production. The two mountain bases each include a Fort and supporting defenses, so a small army cannot simply rush the gates. The northern position has a breachable wall opening to the north; breaking that section gives an approach that avoids some of the strongest defenses. Expect to lose troops during the assault and reinforce rather than sending the entire force in one unsupported wave.
Route and objective management
The map’s river and shallow crossings divide the early battlefield, but controlling the southern town makes movement between the two sides safer. Use this route to rendezvous with the allied army, explore the map and claim Trading Posts or native settlements where the scenario permits. There are 16 Treasures, including resources and unit support, distributed near the starting town, across the river and along the southern approach. The Explorer hero can gather accessible rewards after the immediate defenders are removed. Keep the optional Food objective separate from the mandatory liberation sequence: if the army is weak, delay the crates and continue securing towns. Once the economy and crossing are stable, gather the ally’s forces and attack the forts with a combined army. Track both base objectives so that a successful raid on one does not leave the second untouched.
What makes the battle different from a skirmish
This scenario starts without the ordinary worker economy and makes town liberation the route to production. The player’s initial Insurgentes are useful for the opening fight but should not be treated as a complete late-game composition. Some buildings and unit types unlock only after specific towns are captured, while Home City and Federal State options provide a scenario-specific progression. The battle’s map is based on Mexican and southwestern settings with broad desert terrain, and its scripted Spanish forts make siege planning central to the final stage. In a normal match, a Mexican player chooses a build order and explores the map; here, the order of liberation, the ally’s position and the fixed objective list determine the safe pace.
Recommended mission rhythm
A reliable sequence is to clear the nearest town, restart Villager production, secure the second town and crossing, then decide whether the Food stores can be taken safely. Research Cry of Dolores when a large army is ready to benefit from healing. Add stronger troops and artillery before confronting the last town and mountain forts. Keep El Padre and the allied General alive, use the river route to join forces, and clear enemy artillery before closing on a Fort. If the player loses a major battle, rebuild around the liberated economy instead of repeating the same frontal attack. The scenario ends when both Spanish mountain bases are destroyed, so optional treasures and the food stores should not distract from preparing a protected siege force.
Army composition for the final approach
Insurgentes form the initial force and are useful against cavalry and structures, but their modest combat statistics make them vulnerable to stronger Spanish infantry. Add Salteadors or other ranged infantry to pressure enemy infantry, and use cavalry such as Chinacos to reach Falconets and exposed Settlers. Keep a durable group in front so the guns can fire safely. The exact Home City shipments available in this Historical Battle include resource crates, Settlers, Insurgentes, Salteadors, Culverins, a Factory Wagon and military improvements; the Federal State progression also adds cards at later ages. Choose shipments based on the next objective. A Factory can sustain artillery production, while a Culverin shipment can answer Spanish guns before the player has a normal Artillery Foundry.
Using the Padre’s healing ability
Cry of Dolores turns El Padre into a valuable support unit during the large engagements. Research it at the Cathedral, then keep the hero behind the main line where nearby damaged troops can benefit. Activate the ability after the enemy has dealt meaningful damage to several units rather than at the beginning of a battle. Healing is particularly useful after clearing a town or before pushing toward a Fort, when preserving experienced troops can save time and resources. Do not let the Padre absorb all of the enemy fire: protect him with infantry and move him away from cavalry. His support can help the army recover, but it does not remove the need to reinforce losses or destroy enemy artillery.
Approaching the northern fortress
The northern Royalist base is the more demanding fort assault. Its Outposts and Fort cover the obvious approach, so avoid sending the army directly through the defended gate. Search the northern edge for the small wall opening, break the wall and bring the siege force through that gap. Use Insurgentes to threaten nearby buildings and cavalry to flank the artillery, while Salteadors pressure infantry that tries to protect the guns. Keep your own artillery behind the front line with a unit screen. The initial force may not survive the entire attack; reinforce from the liberated towns and keep pressure on the defenses instead of withdrawing after the first losses. Once the northern position is destroyed, regroup before the southern base rather than letting damaged units wander into its defenses.
Crossing the river and cooperating with the ally
The southern town opens a shallow crossing that lets the player meet the allied Revolutionary Army. This is more than a shortcut: the allied force can draw Spanish attention and provide a second direction of attack. Move a controlled detachment across to clear nearby Treasures and establish Trading Posts, but keep the main force together if the opposite bank is defended. The ally’s army can help hold enemy troops while the player brings siege units to the target. Do not assume that the ally will destroy both forts without assistance; the primary objective belongs to the player and the enemy bases remain the final requirement. Use the crossing to reinforce in stages and keep a safe route for newly produced units.
Recovering from setbacks
If the first assault on a town fails, keep the liberated settlement and use its buildings to rebuild. Replace lost gatherers, protect the Hacienda economy and wait for enough troops to defeat the garrison. A failed early attempt at the food stores is particularly costly if the starting army is destroyed, so scout the site before committing. Treasure rewards can help replace resources and units, but do not send El Padre alone into guardians. Before each fort attack, confirm that the army includes siege, protection against cavalry and enough reinforcements behind it. The map has multiple approaches and the river route provides room to regroup; use those advantages rather than repeating an unsupported frontal attack.