To Finish a Fleet
To Finish a Fleet is an Age of Empires III scenario in Act II: China (scenario 1), set in 1421. The player commands Chinese.
Scenario setting & objectives
The required goals are Destroy the Castle overlooking the captured Dock. (500 XP); Complete the Trade Route. (500 XP); Liberate the captive shipbuilders. (500 XP); Destroy the pirate lair and end the threat to your fleet. (500 XP). Optional goals include Build a Consulate and choose an ally nation. (250 XP).
Mission approach
Treat the four primary objectives as a connected sequence: remove the Castle overlooking the captured Dock, complete the Trade Route, free the captive shipbuilders, and destroy the pirate lair. Keep the starting Qiang Pikemen near the ranged units to deter cavalry, and avoid sending the Flamethrower into an unsupported melee. Protect Villagers building Trading Posts and the rescued shipbuilders, since both the route and the Flagship plan depend on secure access. Build a naval escort before exposing Fishing Boats or moving the Flagship toward pirate-held docks. The optional Consulate can add an ally, but do not delay the primary objectives if the pirates are already threatening your fleet.
Scenario setup and objectives
To Finish a Fleet is the first scenario of Act II: China in The Asian Dynasties. The player controls the Imperial Fleet under Captain Jian Huang and begins with a Town Center, nine Villagers, five Chu Ko Nu, five Qiang Pikemen, two Keshiks, and a Flamethrower. The enemy Wokou Pirates attack early, while a friendly Imperial Shipbuilder operates four Villages, four Docks, a Treasure Ship under construction, and thirteen Villagers. The primary objectives are to destroy the Castle overlooking the captured Dock, complete the Trade Route, liberate the captive shipbuilders, and destroy the pirate lair. Building a Consulate and choosing an ally is optional and awards experience. The Flagship becomes available as the other objectives progress, so the mission's sequence links land control, trade, rescue, and naval strength.
Map and enemy positions
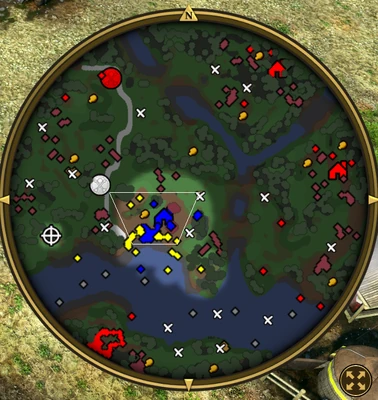
The map is based on the Yellow River and has enemy bases to the west and east, with another pirate position on a southern island. The western base contains a Castle, the eastern base has a Castle and Dock, and the southern island has a War Academy and Dock. The required Castle overlooks the captured Dock, and the pirates' lair must be destroyed to end the threat to the fleet. Enemy forces include Chu Ko Nu, Qiang Pikemen, Changdao Swordsmen, and Arquebusiers; on higher difficulty, Steppe Riders, Keshiks, Flamethrowers, and Hand Mortars add more pressure. Fishing Boats can gather from the water, but they need warship protection. The player should scout the waterways before sending the economy out to fish, since the enemy's docks and island force can attack a vulnerable boat.
Objective order and land army
The starting army is strong enough to defend the Town Center briefly but should not be scattered across the map. Establish Villager production and add military units while pushing toward the western objective. Use Qiang Pikemen against cavalry and keep Chu Ko Nu protected from melee units; the Flamethrower can pressure clustered infantry and buildings but needs a screen. Destroying the western Castle completes one primary objective and opens a route for the Trade Route. Secure the Trade Route before committing to a long island attack, then locate and free the captive shipbuilders. Their release supports the fleet objective and helps advance the scenario's naval progress. Coordinate these tasks so that the same army moves through enemy territory rather than clearing each base in isolation.
Building the fleet and controlling water
The Imperial Shipbuilder's four Docks and Treasure Ship under construction make the eastern area valuable, but the pirates control nearby defenses. Build or protect military ships before relying on Fishing Boats for the economy. A Caravel or another early warship can scout the shoreline and escort fishing vessels, while stronger ships are needed to clear guarded docks. When the Flagship becomes available, use it to support a landing and attack the pirate lair. Keep the ship out of range of coastal defenses until the land army can distract them. If the enemy's Dock remains active, it can continue producing ships, so prioritize destroying or capturing it when the route is safe. The Trade Route and shipbuilder objectives provide progress, but do not leave the Town Center undefended while the fleet is away.
Difficulty and mission pacing
Higher difficulty adds units such as Steppe Riders, Keshiks, Flamethrowers, and Hand Mortars to the pirate force, making a frontal attack more dangerous. Keep anti-cavalry infantry near ranged units, use Chu Ko Nu to reduce incoming troops, and avoid meeting Hand Mortars with exposed infantry alone. The mission can feel urgent because the player is attacked before the Flagship is built, but completing the objectives in a deliberate order gives access to allies and naval support. The optional Consulate can provide a useful ally nation, but it should not delay the Castle, Trade Route, rescue, and pirate lair objectives. Preserve the starting Keshiks for mobile defense and use the Villagers to maintain enough resources for reinforcements. The scenario ends when the pirate threat is removed, so focus on the lair rather than clearing every building on the map.
Completing the Trade Route and rescue
The Trade Route objective requires the player to connect the route through the available Trading Posts, which takes Villagers away from immediate resource gathering. Use a protected path and leave an escort where pirates can attack a newly built Post. Liberating the captive shipbuilders is another primary objective and should be handled before the final assault on the pirate lair, since freeing them contributes to the Flagship sequence and reduces the enemy's hold on the coast. Avoid sending a single Villager or small group through the eastern base without military support. The friendly Imperial Shipbuilder can support naval construction, but the player should still secure the area around its Docks so the Treasure Ship and Fishing Boats are not exposed. Finish optional Consulate construction when the main route is stable; the ally reward is useful, but it is secondary to completing the fleet and ending the pirate threat.
Naval force and final assault
When the Flagship is ready, use it with the land army rather than sending it alone toward the pirate lair. The western and eastern bases are separated by water, and enemy docks can reinforce the shoreline. Use the flagship to draw fire or support a landing while warships clear nearby defenders. If a Castle or Dock still threatens the route, destroy it before transporting Villagers or shipbuilders through the channel. Once the lair is exposed, focus the objective and keep fishing vessels away from the battle. The mission is complete when the pirate fleet's base is removed; the player does not need to eliminate every unit scattered across the map.
Recover shipbuilders and complete the captured route
The first Act II: China scenario requires destroying the Castle overlooking the captured Dock, completing the Trade Route, liberating captive shipbuilders and destroying the pirate lair that threatens the fleet. Each primary goal awards 500 XP. A Consulate and allied nation is optional for 250 XP. Clear the Castle before using the Dock as a safe staging area, then secure the Trade Route so reinforcements or resources can move. Freeing shipbuilders supports the naval focus, while the pirate lair is the final threat to the fleet. Avoid sending ships through the harbor before the coastal defenses are controlled. The mission opens the Chinese act with an emphasis on restoring naval capacity; complete the route and rescue steps before committing to the final pirate assault.