Bolivar's Revolt
Bolivar's Revolt is an Age of Empires III scenario in Act III: Steel (scenario 5), set in 1817. The player commands United States (campaign).
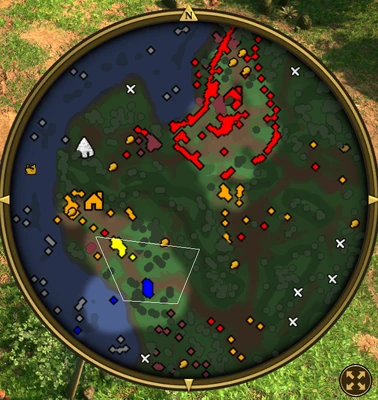
Scenario setting & objectives
The required goals are Help General Bolivar free the town to the north; Help General Bolivar free two more towns; Destroy the Spanish fort's Command Post. Optional goals include Free all four villages from the Spanish; Rescue General Bolivar.
Mission approach
Scout the named destination and keep the required hero or escort force safe on the route; clear defenders before moving the mission-critical unit into range. Scout the target and its approach, then preserve enough of the starting army to finish the required assault. Take optional objectives when they add useful allies, routes, resources or reinforcements without putting the primary goal at risk.
Campaign story and primary objectives
Bolivar’s Revolt is the fifth scenario of Act III: Steel in Age of Empires III. In the story, Amelia Black and Ká:nien arrive in South America while Simón Bolívar leads a rebellion against Spanish rule. The player begins in the Fortress Age with Amelia, Ká:nien, ten Highlanders and one Fluyt. The primary objectives are to help Bolívar free the northern town, liberate two more towns and destroy the Spanish fort’s Command Post. Two secondary goals award experience: free all four villages and rescue General Bolívar. The village route therefore offers both military reinforcements and optional rewards.
Liberating the villages
Local villages join the player when nearby Spanish Outposts are destroyed. Bolívar’s allied army appears at set intervals and advances through the first three villages before attacking the Spanish fort directly; it bypasses the fourth village. If the player wants the secondary reward for freeing every settlement, the fourth village must be cleared separately. The Spanish do not attack in large numbers until the third village is liberated, which creates an early window to build up and secure the first routes. Do not assume Bolívar’s automatic march will complete every objective or wait for his army to clear optional sites.
Map and economy
The map is based on northern South America, with the Caribbean Sea along the west and north, winding jungle paths and several towns. The player can fish and build a naval force from the coast. Mills are available but Estates are not, and Coin is scarce; this makes Coin-heavy units expensive for the player. The Spanish fort has three Estates, so the enemy can maintain Skirmisher production more easily. Dragoons can answer those Skirmishers, but Musketeers are more cost-effective when Coin is limited. A whale resource provides infinite Coin, and an Imperial Age advance can deliver a Factory Wagon; Home City cards can also supply a Factory Wagon.
Prepare for the third town and fort
The third town is often the hardest stage. Spanish reinforcements gather there, the fort overlooks much of the northern half and the Church sits near the center of the settlement. The town is liberated as soon as its Outposts are destroyed, even if Spanish troops remain nearby, so the player can focus on those structures to gain control and then deal with the garrison. Build a Fortified Outpost toward the north to discourage intermittent Spanish naval harassment; the enemy’s moderate fleet can otherwise distract from the village objectives. After the third town, regroup before attacking the fort’s Command Post.
Manage the allied army and rescue
Bolívar’s forces follow a scripted route and attack the fort head-on after visiting the first three villages. Use that pressure to draw Spanish defenders away while Amelia’s group clears a village or protects the flank. The rescue objective is separate from the liberation route, so watch for Bolívar’s position and secure him when the opportunity appears. Preserve the starting Highlanders as the core ranged force and use Ká:nien and Amelia for mission actions rather than sending every hero into the fort’s defenses. The mission can be completed without the optional fourth village, but clearing it adds the experience reward.
Release and historical context
The scenario takes place in 1817 during Bolívar’s campaign in northern South America. Definitive Edition’s later Baltic Powers update changes the ally presentation from Spanish to Mexicans for the local villages and Bolívar’s Army; older versions identify those campaign forces as Spanish. The Spanish flag shown for the period is also anachronistic, reflecting reused game assets. These campaign presentation details do not change the objectives: liberate the settlements, support Bolívar and destroy the Command Post.
Spend scarce Coin deliberately
The player can build Mills but not Estates, while the Spanish fort has three Estates. This gives the enemy a stronger Coin stream and supports repeated Skirmisher production later. Use Musketeers for cost-effective pressure when Coin is scarce, and reserve Dragoons for situations where their ranged Cavalry damage has a clear target. The whale resource provides an infinite Coin source if the player can secure the coast, and the Imperial Age Factory Wagon reward can strengthen the economy for a difficult fort assault.
Use coastal resources safely
The Caribbean Sea borders the north and west of the map and supports fishing and naval production. The Spanish have a moderate fleet and may harass the player intermittently, but a Fortified Outpost toward the north can make the threat manageable. Protect fishing and transport routes rather than diverting the full army to every naval attack. A Fluyt is part of the starting force and can help establish naval control, but the land objectives still require clearing Outposts and destroying the Command Post.
Optional rewards and release identity
The secondary reward for freeing all four villages is 1,000 experience, while rescuing General Bolívar grants 300 experience. These are optional and separate from the three primary stages. The local villages and Bolívar’s army are shown as Mexicans after The Baltic Powers update; before that update they were represented as Spanish. The story remains a South American independence campaign, so the faction presentation should be read as campaign mechanics rather than the standard playable civilization roster.
Keep Bolívar’s scripted route in mind
His army advances through three towns and then attacks the fort, bypassing the fourth. Use that timing to clear the optional village or prepare the economy without expecting his force to do the work for you.
Break the fort objective
The final primary objective is the Spanish fort’s Command Post. Clear the approach and protect the force while it deals siege damage; defeating every unit in the region is not a substitute for destroying the named objective.
Optional village decision
The fourth village is optional for the primary route but required for the 1,000-experience liberation reward. Clear it if the force can do so without delaying the Command Post assault.
Liberate towns before sieging the Spanish command post
Amelia and Ká:nien support Simón Bolívar by freeing the northern town and then two more towns before destroying the Spanish fort’s Command Post. The four-village liberation option expands the objective beyond the minimum three towns, while rescuing Bolívar is another optional task that can change the force available for the final push. Clear each town’s defenders and use the captured buildings to stabilize the army rather than attacking the mountain fort with the starting force alone. Keep a reserve with the heroes because rescue objectives can place them near enemy positions. Once the required towns are free, gather the force and approach the Command Post with enough siege support to finish the objective. This scenario links the Black family campaign to the South American independence story; its scripted revolutionary allies and objectives are specific to Act III: Steel.
Preserve the captured town infrastructure
The scenario restricts what the player’s Settlers can construct, so each liberated settlement is also an economic and production objective. Protect the Market in the first town, the Arsenal in the second and the Church in the third; those structures cannot simply be replaced if they are lost. The first town also contains a Barracks that should be kept intact. The fourth town has two Stables, but those are replaceable and are less critical to preserve. Destroying the nearby Spanish Outposts is what transfers a village to the player, so focus the liberation action on those defenses instead of demolishing useful buildings. Villagers who join after a town is freed can be exposed to the fort’s guns, so move them out of dangerous gathering positions quickly.
Campaign faction changes in Definitive Edition
The village forces and Bolívar’s allied army have a version-specific presentation. Before The Baltic Powers, those campaign groups used Spanish units. In the updated Definitive Edition scenario they use Mexican units, including Salteadors, Insurgentes, Soldados and Chinacos. This changes the faction labels and visual roster while preserving their role in the scripted village liberation and advance on the Spanish fort. Use the scenario’s current faction set when identifying reinforcements, and keep this campaign army distinct from the standard Mexican civilization roster.
The eastern route and the fourth village
The path east of the second town provides a route toward both the third and fourth settlements, with Treasures and an additional silver mine along the way. The fourth village is optional for the main fort assault, but capture it before Bolívar begins that attack if you want its units to support the allied push and to secure the all-villages reward. His scripted army bypasses the settlement, so leave a force to destroy its Outposts instead of expecting the allies to finish it. Once the fort assault has started, the village can still provide its two Stables and cavalry, but the optional objective and experience reward may already be lost.