The Bozeman Trail
The Bozeman Trail is an Age of Empires III scenario in Act II: Shadow (scenario 1), set in 1866. The player commands Black Family Estate.
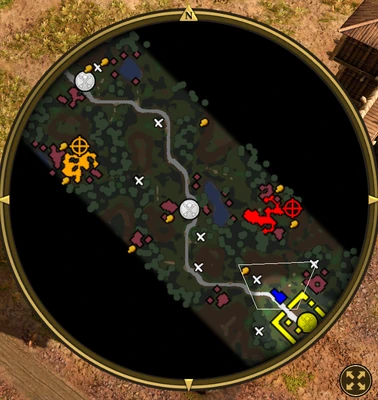
Scenario setting & objectives
The required goals are Find a Trading Post site; Build a Trading Post; Escort the Covered Wagon from Fort Laramie to the Trading Post. (twice); Destroy both; Find a Trading Post site; Build a Trading Post; Escort the Covered Wagon from Fort Laramie to the Trading Post (twice); Destroy both Sioux Town Centers. Optional goals include Own two Trading Posts when the scenario ends; Own two Trading Posts when the scenario ends.
Mission approach
Complete required construction early enough to establish the base or route, then defend the workers and new position. Scout the named destination and keep the required hero or escort force safe on the route; clear defenders before moving the mission-critical unit into range. Scout the target and its approach, then preserve enough of the starting army to finish the required assault. Scout the route before moving the hero or starting force, and avoid splitting units the mission needs together. Take optional objectives when they add useful allies, routes, resources or reinforcements without putting the primary goal at risk.
Scenario setup and mission structure
The Bozeman Trail is the first scenario in Act II: Shadow of The WarChiefs. The player controls the Falcon Trading Company in the Exploration Age, with Chayton Black, Sheriff Billy Holme and eight Skirmishers. Fort Laramie is an ally that supplies Covered Wagons and military reinforcements. The mission begins without starting resources and asks the player to locate and establish Trading Posts along a long northbound route. The scenario then escalates from escort and settlement construction into a sustained military campaign against two enemy positions. The player must keep the Trading Posts in their possession at the end. A secondary objective awards 500 experience for owning two Trading Posts when the scenario ends.
Objectives in the original and Definitive Edition
Both versions begin by asking the player to find a Trading Post site, build a Trading Post and escort a Covered Wagon from Fort Laramie twice. The objective at the end differs: in the original scenario, the player must destroy both Sioux Town Centers; in Definitive Edition, the targets are two hostile bandit camps. The enemy presentation also changes. The original version features Red Cloud and Crazy Horse leading Sioux forces, while Definitive Edition recasts the enemies as the Reno Gang and describes the camps as bandit bases. Keep the version-specific objective in mind when planning the final attack; destroying a Town Center and clearing a camp are different tasks. The secondary objective of holding two Trading Posts applies in both versions.
Secure the first Trading Post and wagon
The player starts southeast of Fort Laramie with the small hero-and-Skirmisher force. Move north along the trail, clear the initial War Club group and collect nearby Treasures when the route is safe. A group of four Wakina Rifles and four Axe Riders appears near the first Trading Post site. Chayton’s Crackshot ability helps remove the approaching enemies, while the Skirmishers handle Infantry. Once the area is clear, build the first Trading Post. Fort Laramie then sends a Covered Wagon with Musketeers. The wagon is essential: if it is destroyed, the scenario is lost. Keep it near the Fort until the main force can meet it, rather than letting it travel alone into the northern route where native attacks can destroy it.
Build a safe settlement before pushing north
Bring the first wagon to the first Trading Post and use it to establish a Town Center nearby. Stay close while it is under construction; leaving the site undefended can allow enemy forces to destroy the incomplete base. Hunt nearby Bison for Food and build enough Houses to support an army. Then advance to the second Trading Post site, where a group of Axe Riders attacks from the west. Musketeers can switch to melee mode to help against the Cavalry. After securing the site, build the second Trading Post and receive another Covered Wagon and four Dragoons. The second Town Center can be placed between the Trading Posts or closer to Fort Laramie, but both Trading Posts need protection for the secondary objective and continued control of the trail.
Reinforcements, defense and army growth
Fort Laramie periodically supports the player with Covered Wagons and units including Musketeers, Skirmishers and Dragoons. Keep a garrison near the central Town Center and another force near the northern Trading Post, because Red Cloud’s attacks arrive from the east while Crazy Horse pressures the western approaches in the original scenario. Build several Longhouses and use Home City shipments for military units such as Tomahawks, Revolutionaries or Kanya Horsemen when those options are available. Sheriff Holme can train Renegados, but they cost substantial Coin and population. The objective is not to chase every enemy patrol: preserve the wagons, hold the route and grow enough production to attack one target at a time.
Attack the two enemy positions in sequence
Once the settlement can produce a mixed army, clear Crazy Horse’s western position first. The original walkthrough recommends a force with Tomahawks, Skirmishers, Dragoons and Musketeers; Chayton’s Crackshot helps against the Axe Riders that charge on arrival. Destroy the western Town Center in the original scenario, or clear the corresponding bandit camp in Definitive Edition, then return to the settlement to heal and reinforce. Red Cloud’s eastern force is larger, so build a second army before advancing. The original route describes roughly twenty Musketeers, ten Skirmishers and remaining Dragoons as a useful starting force. Fight the Cavalry guarding the Fire Pit, then move quickly to the eastern Town Center or camp objective before reinforcements arrive. Hold enough units back to protect both Trading Posts.
Map resources, Treasures and route control
Eight Treasures are placed around the map: several lie along the trail, one sits between the northwestern enemy camp and the central Trading Post, and two are near Fort Laramie. Guardians include wildlife such as Coyotes and Cougars. Claim nearby Treasures while clearing the route, but avoid splitting the starting army when the first rifle and Cavalry ambush is expected. The terrain resembles Great Plains, with Bison, scattered Silver Mines and a long trade route. Hunting far from the settlement can expose Villagers to enemy camps or raids, and mining near the western enemy position is risky. Keep the trail open for wagons and reinforcements; map control is as important as destroying enemy units.
Campaign story and character differences
The opening cinematic introduces Chayton Black at Fort Laramie. In the original version, he meets an older Amelia Black and Sheriff Billy Holme, who is her friend and aide. Their conversation establishes Chayton’s mixed Lakota and Iroquois ancestry before they travel along the route. In Definitive Edition, Amelia does not appear; Chayton and Holme are instead old Union Army comrades from the Civil War, and Holme already knows Chayton’s ancestry. These are distinct story framings for the same scenario. The mission depicts the Falcon Trading Company’s expansion and the conflict surrounding the trail, while its gameplay objective shifts from escort and settlement building to clearing the hostile positions.
Historical setting
The Bozeman Trail was a route in what is now Wyoming, north of the Oregon Trail, used by settlers and miners moving toward western territories during the nineteenth century. Fort Laramie began as a trading post before the United States acquired the site and established a fort. The route crossed Native lands and became a point of conflict as westward migration increased. The scenario’s 1866 setting draws on the period of Red Cloud’s War and the U.S. Army’s attempts to secure routes and forts. The narrative and mission simplifications are part of the campaign; the player’s immediate task is to protect the wagons, establish the Trading Posts and complete the version-specific enemy objectives.
Handling the opening ambushes
The opening patrol of six War Clubs is a manageable test for the eight Skirmishers. Continue north only after Chayton and Holme are healthy enough to face the next group. Near the first Trading Post site, the four Wakina Rifles and four Axe Riders arrive together; let Chayton use Crackshot on a dangerous target and focus the Skirmishers on Infantry while the heroes draw pressure. Later, four Bow Riders attack the force moving south to meet the first Covered Wagon. These scheduled raids make it safer to rendezvous near Fort Laramie than to let the wagon travel alone. Use nearby Treasures only when the ambush area is clear.
Keep both Trading Posts until victory
The two Trading Posts are not optional scenery: owning both at the end grants the 500-experience secondary objective and helps secure the trail. Keep a small garrison at the northern site while the main army moves west or east. The wagons are equally important because each establishes a Town Center and expands production. If a wagon is lost, the mission fails, so do not use it to scout or lead an attack. In the original version, the final objective is the destruction of the two Sioux Town Centers; in Definitive Edition, clear the bandit camps. Recheck the objective panel after each milestone because the scenario reveals goals as the route develops.
Protecting heroes and rebuilding after a fight
Chayton and Holme are persistent assets, so keep them near the Skirmishers and let their abilities support the larger force. Chayton’s Crackshot is particularly useful against enemy Cavalry during the scripted attacks. After the western position is cleared, return to the settlement rather than pushing directly into Red Cloud’s larger army. Heal the heroes, replace lost Musketeers and add Houses before the final advance. The enemy can continue attacking while the player rebuilds, so maintain a garrison at the northern Trading Post and keep the Covered Wagon route open.
Escort two Covered Wagons along the trail
This Act II: Shadow scenario introduces Chayton Black and Sheriff Billy Holme as the Falcon Railroad Company expands westward. The required route begins by locating and building a Trading Post, then escorting a Covered Wagon from Fort Laramie to the Trading Post twice before destroying both Sioux Town Centers. The escort is repeated, so do not spend the first convoy’s full guard force on optional fighting; preserve enough troops to protect the second trip. The secondary objective is to own two Trading Posts when the scenario ends. Establish the first post early, then look for a safe second site while keeping the wagons’ route clear. Keep a mobile force ahead of each wagon to remove threats, with a rear guard to prevent raids against the escort. The mission’s railroad expansion theme makes the Trading Posts and wagon delivery central to progress; chasing every enemy unit is less useful than securing both deliveries and the final targets.
Protect the Trading Posts between wagon deliveries
The mission sends two Covered Wagons from Fort Laramie to a Trading Post and then asks the player to destroy both Sioux Town Centers. Keep a guard force near the post while each wagon travels; the first successful delivery does not secure the second route. Establish two Trading Posts if pursuing the optional end condition, and scout the path before moving the next wagon. Once both deliveries are complete, regroup and siege the Town Centers rather than leaving escort units scattered along the trail. Chayton Black and Sheriff Billy Holme introduce the act’s western story, and the railroad expansion theme makes the wagons and route control the central mechanics. Prioritize safe delivery over killing every enemy patrol.