A Reckoning
A Reckoning is scenario two of Act II: Shadow in The WarChiefs campaign, set in 1866. The player commands the Black Family Estate while the story moves through the aftermath of the Civil War and the struggle over western expansion. Its objectives combine rescuing railroad workers with establishing control of a Trade Route.
Scenario setting & objectives
The required goals are to save 20 Railroad Workers, build three Trading Posts and upgrade the Trade Route. A separate objective targets the Hole in the Wall Gang’s hideout. These tasks pull the player between protecting people and securing map infrastructure; the Trading Posts are important both as objectives and as a way to claim route benefits.
Mission approach
Locate the workers and route sites early, then build in an order that leaves enough force to protect the exposed construction. Keep the workers safe while the route is being claimed; an optional hideout attack should not draw the entire army away from those required objectives. Use the briefing and on-screen objective list to track which parts remain.
Campaign story and edition differences
A Reckoning is scenario two of Act II: Shadow in The WarChiefs campaign. The 1866 setting follows Chayton Black and Sheriff Billy Holme after they secure the trail and pursue the people responsible for attacks on travelers and workers. The original scenario, titled Red Cloud's War, focused on conflict with Red Cloud and the Sioux; Definitive Edition retitles it A Reckoning and changes the immediate opponents to the Reno Gang and other outlaws. The cinematic also differs: the original begins with an ambushed caravan and Holme's matter-of-fact recollection of the American Civil War, while the Definitive Edition shows a Lakota village and gives Chayton a more personal reason to investigate. These are campaign-specific representations of the story rather than a skirmish encounter with a normal Lakota or United States roster.
Objectives and available forces
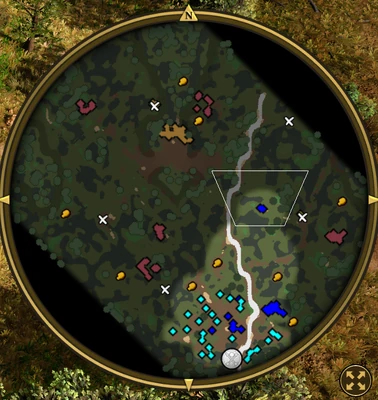
The player begins as the Falcon Trading Company with Chayton, Sheriff Holme, and several Outlaws. The primary objectives are to rescue twenty Railroad Workers and build three Trading Posts, then upgrade the Trade Route. A separate objective asks the player to destroy the Hole in the Wall Gang hideout. In the Definitive Edition, the rescued workers join the player when they reach safety; the original version instead describes the United States as sending reinforcements such as Covered Wagons, Musketeers, Skirmishers, and Dragoons. A settlement becomes available after the opening skirmish, with a Bank, Community Plaza, Houses, and three Outposts, plus free Cows. Outlaws and mercenaries protect it while enemy groups threaten workers along the north-south route. The hideout is a Saloon defended by Renegados and Pistoleros.
Map and rescue flow
The map resembles Great Plains and contains Silver Mines near the settlement and along the long route. Railroad Workers can mine coin, allowing the rescue to contribute to the player's economy once they are protected. Five treasures are recorded around the map, including a War Dog reward and Settler-related rewards. The opening fight rescues two workers; additional groups appear under attack on the northwest and around the settlement. Use Outposts to shelter workers who are being chased and keep the heroes near the routes where their abilities can remove dangerous raiders. Chayton can use Hawk Eye against a Renegado and Eagle Eye against an Axe Rider, reducing the risk to the workers without committing the entire army to the chase. The goal is to protect enough workers and gather a mobile response before the attacks become too widespread.
Defeating the hideout
The Hole in the Wall Gang hideout is guarded by a medium-sized group of powerful Outlaws: roughly seven or eight Renegados and four Pistoleros. Train additional Outlaws such as Comancheros and Renegados from the settlement, then combine them with Chayton and Holme for the assault. After defeating the defenders, raze the Saloon immediately. Leaving it standing lets the gang continue producing Outlaws and can turn a successful fight into a prolonged drain on the settlement's defenses. Once the hideout is gone, more Railroad Workers can reach safety and the rescue total advances toward twenty. Maintain a garrison at the main base while the raiding party is north, because the original and Definitive Edition versions use different enemy factions but both make protection of civilians the central campaign pressure.
Trade Route and completion plan
After rescuing the workers, build three Trading Posts along the route and improve it to the required Iron Horse level. This is a construction and economy objective, not a requirement to defeat every enemy army. Use the time before committing to the posts to raise the economy and prepare a defensive mix; the campaign strategy recommends Musketeers with Pistoleros and artillery support against the later waves. Keep Villagers gathering wood, coin, and food, and use shipments for economic upgrades and additional Settlers. As the game advances, attacks include War Clubs, Rifle Riders, and Axe Riders, so leaving the settlement with only an escort force is risky. Chayton and Holme can help complete the distant Trading Posts after the base is secure. Finish all three posts and the Trade Route upgrade to end the scenario; the optional Saloon objective is valuable because it stops recurring outlaw production.
Keeping workers and heroes safe
The rescue is designed as a flowing objective, so the player should not chase every group across the whole map. Use the opening Outlaws with Chayton and Holme to disperse the first raiders, then send the heroes ahead along the route to scout and collect safe treasures. If Railroad Workers are attacked near the settlement, garrison them in the closest Outpost so they survive until the escort force arrives. Keep a defensive army in the main base while another group escorts the workers and attacks the Saloon. The Wall Gang's Pistoleros and Renegados are stronger than the early patrols, so add reinforcements before engaging them. After the Saloon is destroyed and the worker count is secured, the scenario becomes a more conventional defense-and-construction task: guard the settlement from recurring attacks while completing the three Trading Posts.
Protect railroad workers while securing the Trade Route
A Reckoning requires the player to save 20 Railroad Workers, build three Trading Posts and upgrade the Trade Route. The optional Hole in the Wall Gang hideout can be destroyed after the workers and route are secure. Definitive Edition renamed the scenario from Red Cloud’s War and shifted its presentation to attacks by gangs and outlaws on workers and miners, so older campaign references may describe a different framing. Guard the workers’ escape route and do not send them through the same exposed path as the combat force. Establish the Trading Posts in a sequence that allows each site to be defended while builders move to the next. The mission represents the opening of the conflict in 1866; the railroad and workers are central objectives, not incidental economy. Keep a mobile reserve near the most exposed post so a raid cannot interrupt the upgrade while the workers are still in danger.