Claims
Claims is scenario three of Act II: Shadow in The WarChiefs campaign, set in 1876. The Black Family Estate is caught in a conflict over mining and settlement claims. The scenario asks the player to break an enemy military position while keeping important resource sites and Trade Route holdings from being lost.
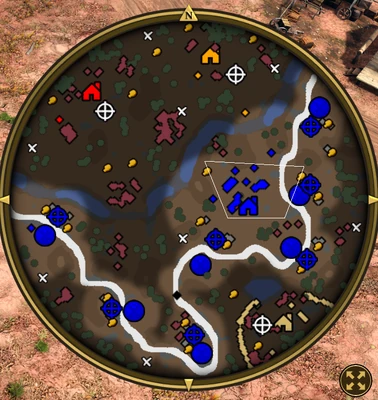
Scenario setting & objectives
The required objective is to destroy all enemy Barracks. Additional objectives track four Mining Camps and friendly Trading Posts; their wording and reward conditions are displayed in the mission objective list. The camps and posts represent the player’s economic foothold, so sending every unit to the enemy base can leave the map objectives exposed.
Mission approach
Scout the Barracks and identify the routes between them and the resource sites. Keep defenders or a mobile reserve near the Mining Camps and Trading Posts while assembling enough force for the required assault. Read each objective’s exact success condition in the active edition, since optional survival goals can differ in reward and completion status.
Scenario setting and changing enemies
Claims is the third scenario of Act II: Shadow in The WarChiefs. Set in 1876, it follows Chayton Black after the earlier conflict with Sheriff Billy Holme. Holme describes the gold in the Black Hills and the opportunity to expand the Falcon Trading Company, while Lakota forces also seek control of the mining region. The player's force controls seven Trading Posts along a route from the east to the southwest, with a Mining Camp near each one. In the original scenario, two Lakota encampments and a Spanish town threaten the route. The Definitive Edition changes the enemies so rival miners and outlaw or mercenary forces replace the Lakota factions in the encounter. The objective remains focused on enemy military buildings and protecting the mining camps. These differences matter when planning counters: the original Lakota rely heavily on Corral units, while the revised scenario includes bandit groups and other rival miners.
Objectives and reward conditions
The primary task is to destroy the enemy Barracks while keeping at least four Mining Camps from being destroyed. The secondary objectives award experience for protecting every Mining Camp and every Trading Post. This means the player can win without preserving all seven camps, but doing so forfeits the full bonus. The Trade Route and camps lie far apart, so a single army cannot cover every attack route at once. Scouting and mobile reinforcements are important from the beginning. Eight Turquoise Mask treasures are scattered along the route and across the river, adding rewards for exploration but also pulling units away from defense. Complete a treasure detour when the area is safe; do not lose a Mining Camp while pursuing a minor reward. The 200-population starting cap provides room to train a substantial army without first investing in population buildings.
Use the Trading Posts as an adjustable economy
The seven Trading Posts can generate resources and should be configured to address the scenario's immediate bottlenecks. Wood is scarce, so the standard plan is to assign four or five posts to Wood, two to Food, and one to Coin, then change the distribution as production needs evolve. A Lakota Warchief can build a Town Center southeast of the map near the Mining Camps; use it to train Villagers who gather Coin from the rich nearby mines. The starting Town Center can focus on Food gatherers, using a Farm or a Farm Travois if the deck provides one. The mines make early Plantation investment unnecessary. The long-term economy should support roughly 30 gatherers on Food and 30 on Coin, though the exact split can change as the army grows. Reassigning posts is faster than constructing an entirely new economy, so adjust their output when Wood is no longer the immediate constraint.
Choose units for the moving defense
The camps are separated across the map, and attacks may arrive at more than one location. Dragoons are valuable because they move quickly and counter the Lakota Axe Riders; Skirmishers can attack Rifle Riders and Bow Riders from range. In the original version, Lakota forces rely on Corral units, which makes a mobile Cavalry counter particularly useful. Spanish forces pressure the player early with Hussars, Lancers, and Rodeleros, so combine Dragoons and Skirmishers rather than expecting one unit type to answer everything. A group of Hussars can absorb attention from Axe Riders while Dragoons deal damage. Falconets are risky because the enemy can mass Cavalry; only train them when the army can protect them and their building damage is immediately needed. Keep a mobile reserve near the center so it can reinforce the camp currently under the greatest pressure.
A steady route to the enemy buildings
The safer plan is to build the economy and army while defending the mining route, then attack enemy buildings with a force large enough to survive counterattacks. Once population approaches roughly 175, including Villagers, advancing to Industrial Age can unlock upgrades for the current army. When attacking the Lakota camps in the original version, only one War Hut at each encampment needs to be destroyed. Take down one objective building, then move the attack force to the second camp rather than fighting every unit and structure. The Spanish town is walled, but it may produce few units after its opening attack; a separate raid can remove its Barracks while the main army watches the Lakota approaches. The goal is to destroy the required production buildings, not to erase every structure on the map.
Fast attack and its risks
A faster alternative is to use the starting force to attack the Spanish town immediately, gathering Food and Coin while replacing losses. After defeating the Spanish troops, break through the wall and destroy the Barracks. The Lakota may then attack two Mining Camps; respond quickly if the secondary objective to protect every camp matters. Send the main force against the slower Orange Lakota camp first, remove its War Hut, and then turn toward the Red camp. This approach can finish before the enemy launches a full attack on the Trade Route, but it relies on winning the early Spanish fight with limited economic growth. If the assault stalls, the camps may fall while the player has too few Villagers and units to recover. Use it when the starting army, map position, and difficulty make an early attack plausible; choose the steady economy if camp protection is the priority.
Map resources and treasure choices
The route crosses terrain similar to the Great Plains, with Bison in the west, Silver Mines near camps and settlements, and a river separating some treasure locations. Bison are not a dependable primary Food source because enemy raids can disrupt hunting parties. The Railroad Workers can gather Coin from mines, while the player's own Villagers should focus on the mines near the southeast Town Center. Treasures include eight Turquoise Masks, four along the Trade Route and the rest across the river. Explore with mobile units and the Warchief when the camps are safe; avoid sending a large army across the map only to collect a treasure while the enemy attacks a distant objective. This map rewards dividing the force into a main army, a reserve, and small scouting groups.
Version-aware objective checklist
Before the first attack, confirm which enemy faction appears in the version being played, then divide the army between camp defense and the required enemy production buildings. The original scenario uses two Lakota War Huts and a Spanish Barracks; Definitive Edition changes the enemy composition. Resource posts can be reassigned, the seven Trading Posts support the economy, and the secondary rewards require preserving every camp and Trading Post. This checklist keeps the original and Definitive Edition objectives distinct and helps avoid an avoidable loss while chasing a treasure or attacking the wrong base.
Keep the objectives in view during attacks
The safest attack is not always the fastest one. A force sent to the Spanish town or a Lakota camp leaves other Mining Camps and Trading Posts exposed, so assign a reserve to watch the route and answer raids. Destroy only the required military buildings, then redirect the main army instead of clearing every structure. If the player seeks the secondary experience, preserve every camp and post even after the primary objective is nearly complete. Changing the Trading Posts from Wood to Food or Coin as the economy develops helps sustain the reserve without sacrificing the force already in the field.