Uprising!
Uprising! is scenario 2 of Act I: Japan in The Asian Dynasties. In 1600, Uesugi Kagekatsu’s eastern clans rebel against Tokugawa, and Kichiro must turn threatened villages into support before Uesugi’s army arrives.
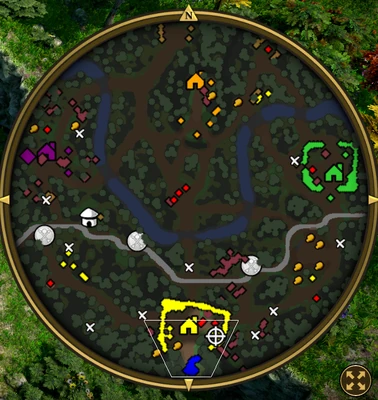
Scenario setting & objectives
Ride to the nearest town and free its Villagers, then destroy as many villages as possible before Uesugi arrives and defeat his army. Optional tasks free Villagers held in Stockades, destroy the Disgraced Barracks and rebuild every Trading Post on the Trade Route. The order links rescue, time pressure and the final battle: delaying the enemy’s village control can improve the force available for the later fight.
Mission approach
Move to the nearest town immediately and free its Villagers before spending time on remote objectives. Use the resulting support to clear villages along the route, then regroup before engaging Uesugi. Take optional Stockades or Trading Posts when the path is secure and the detour does not cost the army its window to respond.
Opening situation and primary goals
Uprising! is the second scenario of Act I: Japan in The Asian Dynasties, set in 1600 after the Siege of Osaka. Uesugi Kagekatsu’s eastern clans rise against Tokugawa, and Kichiro and Mototada must prevent the villages from joining the rebellion before Uesugi’s main army arrives. The player starts in the south with Daimyo Mototada, Kichiro and a force of Naginata Riders, Samurai and Yumi Archers. The three primary goals are to ride to the nearest town and free its Villagers, destroy as many villages as possible before Uesugi arrives, and defeat Uesugi’s final army. Optional objectives reward freeing imprisoned Villagers, destroying the disgraced Barracks and rebuilding every Trading Post along the Trade Route.
The village timer and army movement
The scenario is short but runs on a deadline. Each enemy village left intact can contribute forces to Uesugi’s final attack, so clearing settlements early reduces the strength of the end battle. The player begins with a strong mobile army but not a developed economy. Move the heroes with the army and use the existing force to take the nearest village first; liberating it restores Villagers and opens the path to economic support. Do not divide the starting army into several small groups before the first defenses are cleared. After the opening village, choose the next target based on distance and defenses, and keep enough units together to defeat the Town Center that anchors each hostile settlement.
Destroying hostile villages
Three major Uesugi-aligned villages are spread across the map: one to the east, one near the center and one in the west. Each contains a Town Center that must be destroyed to prevent the settlement from joining the enemy army. Castles, Barracks, Stables and walls can protect them, and enemy units include Ashigaru Musketeers, Naginata Riders, Samurai and Yumi Archers. The Eastern Clan’s settlement has a walled approach and a Stockade holding Villagers; the central village includes a Castle, while the western village also has a Castle and imprisoned workers. Focus siege on the Town Center and use the army to clear defenders. Do not spend the entire timer attacking optional buildings if the settlement’s Town Center remains active.
Rescue Villagers and rebuild the economy
Villagers are held in Stockades around the map, and freeing them supports both the optional objective and the player’s economy. Clear the guards before sending units to the Stockade, then use rescued workers to gather resources or help rebuild Trading Posts. The starting army is sufficient for an aggressive opening, but replacements matter before Uesugi arrives. Capture or rebuild the Trading Posts along the west-to-east Trade Route when the army can protect the workers; the route can supply experience and help fund reinforcements through the mission’s Home City progression. Optional objectives should be pursued during movement between villages rather than in a separate long detour.
The disgraced Barracks and optional tasks
A defended Disgraced Barracks can be destroyed for an experience reward. Hamamoto Samurai protect it, so clear the defenders before committing siege. Freeing every imprisoned Villager likewise requires dealing with local guards, and a Stockade rescue can take time if the main army is already far away. These optional tasks are most efficient when they lie near the next village route. If Uesugi’s arrival is close, prioritize Town Centers and prepare a defense rather than risking the primary army for a secondary reward. The mission’s optional objectives improve the player’s position but do not replace the required defeat of the final army.
Preparing for Uesugi’s army
The final force arrives after the village phase and includes Daimyo Uesugi with a balanced Japanese army. On Normal or Hard difficulty, the force can add Yabusame Archers, Ronin and Flaming Arrows to Ashigaru, Naginata Riders, Samurai and Yumi Archers. Return toward the southern friendly village before the countdown ends and use its walls and defensive position. Station ranged units where they can fire safely, keep Naginata Riders ready to intercept cavalry and protect artillery or vulnerable archers from a direct charge. Healing, reinforcements and surviving heroes are valuable; do not leave them exposed while chasing a last optional building.
Use the map and Trade Route
The map’s Trading Posts run from west to east and separate the enemy villages. Rebuilding all of them is optional, but doing so provides the stated experience reward and can strengthen Home City shipment access. Secure the nearest sites only after removing nearby defenders, then keep a small force close enough to prevent them being retaken. Ten Treasures are scattered between the player’s base and the clans, with some near the western and eastern villages. The Daimyo and Kichiro can help clear guardians and collect rewards, but a Treasure detour should not cost the time needed to destroy a hostile Town Center. The central village and route sites can be approached from either side, so use the army’s mobility to avoid repeatedly crossing defended ground.
Difficulty, story and practical plan
The scenario’s timer, enemy composition and strength depend on difficulty. A conservative route is to clear the nearest village, free workers, then move to the central and eastern settlements while destroying their Town Centers. Attack the western settlement and optional Barracks only if the army remains strong and enough time is available. Begin moving home before Uesugi’s force appears, then fight behind the friendly village defenses. The story continues Kichiro’s service under Tokugawa after the fall of Osaka and frames the uprising as a threat to Tokugawa’s rule. It is a dramatized historical campaign, not a representation of ordinary Japanese skirmish play: the player receives a fixed starting army, scripted enemy villages and a timed final battle.
Target order and retreat timing
Prioritize settlements whose Town Centers can be reached quickly and whose destruction prevents the largest reinforcement contribution. Keep the heroes and siege together, and retreat to the southern village before the final army arrives. Use the walls to protect Yumi Archers and let Naginata Riders intercept enemy cavalry. If optional rescues are unfinished when the timer is nearly over, preserve the main army and complete the primary victory condition first.
Ending the scenario
Once Uesugi’s army appears, the objective changes from denying reinforcements to winning a defensive battle. Remove the enemy’s ranged cavalry and siege threats, keep the Daimyo alive and use the friendly settlement as a rally point. The scenario is complete when the invading army is defeated; destroying every building is unnecessary unless it supports an optional objective or protects the retreat.
Managing the final attack
When the final army approaches, avoid fighting it in open ground if the friendly village is still defensible. Bring the ranged units behind the walls, keep melee troops near the likely breach and let the enemy engage while the player focuses fire on its most dangerous units. The heroes can draw attention briefly, but should retreat before becoming surrounded. Use surviving Villagers to repair or rebuild where the scenario allows, and reinforce from the nearest production buildings rather than sending reinforcements alone across the map.
Objective rewards and priorities
The mission awards substantial experience for freeing the first town, destroying villages and defeating Uesugi, with smaller rewards for the optional Barracks and Trade Route objectives. The largest reward aligns with the primary route: liberate settlements and stop them joining the uprising. Optional rewards help but should not delay that sequence. A player aiming for a complete objective record should plan a route that passes the Stockades, Barracks and Trading Posts while moving between Town Centers, then return before the final attack.
Why the village phase matters
Destroying a village’s Town Center is the decisive action because it stops that clan from contributing to Uesugi. Clearing nearby units without removing the center leaves the threat in place. Conversely, once the Town Center falls, the player can move on instead of spending time razing every structure. This distinction saves time under the scenario timer and keeps the army available to deal with the next clan.
Coordinating the allied villagers
The rescued Villagers are both a mission objective and the basis for any sustained economy. Protect them as they move from Stockades, assign them to safe nearby resources and keep the army between them and Uesugi’s patrols. Rebuilding a Trading Post or gathering a Treasure is useful only when the workers can return safely; do not leave them exposed while the main force attacks a Castle.
Free villages before Uesugi’s army arrives
The second Act I: Japan scenario is a race against Uesugi’s arrival. Ride to the nearest town and free its Villagers for 1,000 XP, then destroy as many enemy villages as possible before Uesugi appears for 6,000 XP. The final primary objective is to destroy Uesugi’s army for 2,000 XP. Freeing the imprisoned Villagers from Stockades, destroying the Disgraced Barracks and rebuilding the Trade Route Trading Posts are optional tasks that can strengthen the expedition, but each costs time before the army arrives. Split the force only when one group can finish an objective without losing the main raiding party. Prioritize nearby villages and production buildings, then regroup to meet Uesugi. The story follows the uprising after Osaka and the threat to Tokugawa’s position; delaying the enemy and gathering allies are both part of the mission’s strategy.
Experience rewards for each objective
The three primary objectives carry different experience rewards: freeing the nearest town’s Villagers grants 1,000 XP, destroying as many hostile villages as possible before Uesugi arrives grants 6,000 XP, and defeating Uesugi’s army grants 2,000 XP. The optional Disgraced Barracks objective grants 600 XP, and rebuilding all Trading Posts along the Trade Route grants another 600 XP. The largest single reward is tied to clearing villages before the final army arrives, so a long detour for the smaller optional rewards can cost both time and combat strength. The source lists no separate XP amount for freeing the imprisoned Villagers.