Into the Caves
Into the Caves is an Age of Empires III scenario in Act I: Blood (scenario 2), set in 1565. The player commands Knights of St. John.
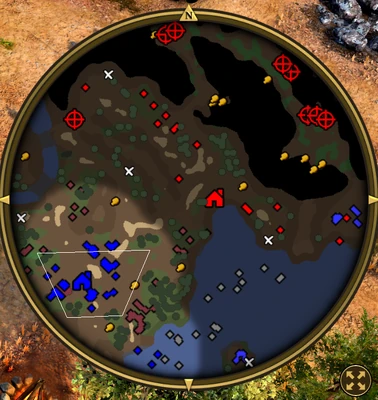
Scenario setting & objectives
The required goals are Defend the base from the Ottoman attack; Destroy all the Ottoman Weapon Caches. (8 total). Optional goals include Claim the nearby Treasure; Build an Artillery Foundry and train at least 10 Hoop Throwers; Find a shipwreck and gather any supplies near it.
Mission approach
Hold the base against the Ottoman attack while clearing all eight Weapon Caches; clearing only the nearest cache does not finish the required objective. Keep a reserve near the base as the force moves between caches. The Artillery Foundry and ten Hoop Throwers are optional, but can help if the enemy pressure permits the extra setup.
Mission setup and objectives
Into the Caves is the second scenario of Act I: Blood, set in 1565 after the Knights of St. John drive Sahin's Ottoman force away from Malta. Morgan Black and Alain Magnan pursue the remaining Ottoman camps, carrying a captured Great Bombard. The player remains in the Fortress Age throughout the mission and has a population limit of 200, but the Home City is unavailable: shipments cannot be sent during play, and experience earned is saved for later campaign progression. The opening force includes Morgan and Alain, 24 Crossbowmen, three Swiss Pikemen, one Great Bombard, a Priest, ten Settlers, and a Fishing Boat. Starting resources depend on difficulty: Easy grants 1,500 food, 1,300 wood, and 1,300 coin; Moderate grants 1,300 food, 1,100 wood, and 1,100 coin; Hard grants 1,000 food, 800 wood, and 800 coin.
Primary and optional tasks
The main task is to defend the base against the immediate Ottoman assault and destroy all eight Weapon Caches. These caches are scattered around the mission area, so defeating the first wave alone does not complete the scenario. Three Stockades hold a total of fifteen Swiss Pikemen prisoner; freeing them can add valuable melee siege support to the army. Optional objectives are to claim the nearby treasure for 300 experience, build an Artillery Foundry and train at least ten Hoop Throwers for 500 experience, and locate a shipwreck and collect its supplies for 300 experience. The enemy begins with Janissaries and can later add cavalry and siege units, including Abus Gunners, so the player must keep enough force at home while sending a detachment to remove the caches.
Difficulty and battlefield pressure
Enemy strength and defenses scale with difficulty. On Easy, Ottoman Settlers and Janissaries are fewer and their base has one Barracks and one Artillery Foundry. Moderate adds a second Barracks and an Outpost near the mine entrance while still reducing enemy numbers compared with Hard. On Hard, the player has one fewer nearby silver mine, and the Ottomans have their full Settler and Janissary force, two Outposts guarding different approaches to the mine, and a more forceful initial attack. The player begins with two Barracks, two Outposts, a Town Center, Dock, Field Hospital, and Houses. Those buildings make the settlement defensible, but an early raid can pull units away from cache hunting. Protect Settlers and maintain production before committing the entire army to the cave approaches.
Using the starting army
The Great Bombard is the most important early answer to clustered troops and defensive structures; keep it behind the Crossbowmen and Swiss Pikemen, and avoid leaving it exposed to cavalry. The Crossbowmen provide the bulk of ranged damage against infantry, while Swiss Pikemen can punish cavalry and help demolish buildings. Save the initial force where possible because shipments are unavailable and replacement armies must be paid for with the limited starting economy. Use Morgan and Alain to explore and secure the nearby treasure, but protect them from concentrated Janissary fire. A balanced plan is to hold the base against the opening push, rescue the captive pikemen, then clear each Weapon Cache with bombard support. The optional Hoop Thrower task requires investment in an Artillery Foundry, so attempt it after the defense is stable rather than sacrificing the force needed for the eight mandatory objectives.
Choosing between a fast clear and a full defense
The mission supports two different priorities. For a straightforward clear, protect the starting settlement through the first attack, reinforce the Crossbowmen, and use the Bombard to open a route to the Weapon Caches. A cache-focused run can finish in roughly five to seven minutes if the force travels directly and does not spend time eliminating every enemy building. Keep the Bombard selected and ready to move so it does not lag behind the infantry. The caches, rather than the Ottoman Town Center, are the required targets. If the goal is a safer campaign run or more experience, establish control of the surrounding base first, heal at the Field Hospital or with the Priest, and rescue the Swiss Pikemen from their Stockades before advancing. On Hard, pay attention to the cave approaches because extra Outposts cover the mine and enemy resistance is strongest. Supplies near the shipwreck include resource crates, and the wood pile near the cave entrance can help fund reinforcements, but collecting them costs time and can expose a small detachment. The scenario ends when the last cache falls, so optional exploration is best done before the final target.
Map supplies and campaign progression
The scenario has five listed treasures, including one north of the base and another on an island to the southeast. A shipwreck can be searched for crates containing 1,000 coin, 500 food, and 500 wood; a resource cache near the cave entrance offers another 600 wood. These supplies can help offset the absence of Home City shipments, though sending a small force away from the base too early risks losing it to the Ottoman attack. The mission is also useful for campaign experience, which is retained even though no shipment can be called in during this scenario. The following Library of Stone cinematic continues the Act I story after the Ottoman threat has been removed.
Defend the base while clearing eight Weapon Caches
The second Act I: Blood scenario asks the Knights of St. John to remove the remaining Ottoman threat on the island. Defend the base from attack and destroy all eight Ottoman Weapon Caches. Optional tasks include claiming a nearby Treasure, building an Artillery Foundry and training at least ten Hoop Throwers, and finding a shipwreck to gather supplies. Keep a stable garrison at the base while sending a force to clear caches one area at a time. The Foundry objective requires a production investment, so begin it while the base is secure rather than during a heavy attack. A shipwreck or Treasure can strengthen the economy, but do not scatter the army across the map. Count the Weapon Caches as they are destroyed and preserve enough siege or damage to finish the last ones.