Pirates!
Pirates! is an Age of Empires III scenario in Act I: Blood (scenario 3), set in 1566. The player commands Knights of St. John.
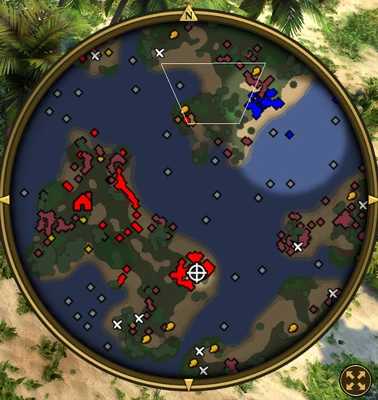
Scenario setting & objectives
The required goals are Build a Town Center; Build a Barracks and a Dock; Find and collect three Navigation Charts. Optional goals include Build a second Town Center.
Mission approach
Complete required construction early enough to establish the base or route, then defend the workers and new position. Scout the route before moving the hero or starting force, and avoid splitting units the mission needs together. Take optional objectives when they add useful allies, routes, resources or reinforcements without putting the primary goal at risk.
Establish the colony before sailing west
Pirates! is the third scenario of Act I: Blood. Morgan Black and the Knights of St. John are sailing toward the New World when Elisabet Ramsey’s pirates attack. The player begins in the Commerce Age with no Home City access, so collected experience is saved for later missions but shipments cannot be sent during this one. The starting force includes Morgan, four Veteran Crossbowmen, three Veteran Hussars, three Veteran Pikemen, a damaged flagship, one Covered Wagon and resource stockpiles and crates. Building the first Town Center unpacks the wagon and releases seven Settlers. The main objectives are to build that Town Center, construct a Barracks and Dock, and collect three Navigation Charts. The starting Caravel is sunk by the opening Fire Ship attack, while Morgan’s flagship is badly damaged. Build the Dock quickly to trigger periodic free ship and unit support, then protect the coastline as the economy develops. The Covered Wagon’s Town Center is an important safe point: the secondary objective for a second Town Center grants 500 XP and adds another place to defend the Settlers. Use the starting resources to establish production and gather from the islands, but keep an eye on Carib raids and pirate landings. Fishing Boats and Settlers can be attacked from both the sea and shore. The three Navigation Charts are guarded treasures located on the eastern island, east side of the large pirate island and within the enemy base. Each is a primary objective; collecting them advances the mission. The map contains twelve treasures and scattered supply crates, many near pirate mining sites and guarded by enemies. Use Morgan and the veteran troops to clear small groups, then send a protected detachment to collect a chart. Avoid sending Settlers into a treasure guardian fight. Buccaneers, Crossbowmen, Pikemen, Skirmishers and Carib Blowgunners defend the pirate positions, while Canoes can move attackers between islands. The enemy’s Fire Ships, Privateers and coastal troops make naval control necessary. Keep newly granted ships near the Dock until they can form a group, and use the flagship carefully because it is already damaged. The western pirate island contains the fortified base; approach only after the land force can protect artillery or siege units from raiders. Control of the water lets the player transport troops and protect Fishing Boats, but the objective does not require destroying every enemy unit. Clear the route to each Navigation Chart and preserve enough forces to defend the colony while the army is away. This scenario follows Into the Caves and leads to The Ottoman Fort. Its initial land battle and later settlement phase differ from a standard Caribbean match: the Home City is unavailable, the flagship provides scripted reinforcement after a Dock is built, and victory is tied to the three charts plus the required buildings. Plan around those scripted rules instead of relying on a normal shipment-based opening. Build the colony, establish land and naval production, secure each chart and keep the Settlers safe from raids.
Keep the flagship and colony working together
The damaged flagship is part of the scenario’s continuing naval support, not a disposable first attack. Build the Dock and gather a protective ship group before exposing it to the pirates’ Fire Ships and Privateers. Meanwhile, use the land force to clear the first island and secure resources for the second Town Center. Keep enough Settlers near the colony to replace losses and avoid sending every soldier across the sea at once. The chart in the pirate base is the most dangerous objective, so approach it after the Dock and colony can continue functioning without the main army.
Complete the chart objectives methodically
Each chart is an objective treasure, so mark the three islands and clear their guards in an order that limits travel across dangerous water. Use the Dock’s periodic support to keep a ship near the Settlers and another with Morgan’s flagship. Once a landing is secured, unload the army and collect the chart before moving toward the next one. Treasure caches and supply crates are useful, but they are optional; do not lose the colony while chasing them.
Defend the landing after each chart
Once a chart has been collected, leave a small guard near the landing or use the flagship to cover the withdrawal. The islands remain vulnerable to Carib and pirate raids, so regroup before sending the full army onward.
Develop the island before collecting the three charts
The mission requires a Town Center, a Barracks, a Dock and three Navigation Charts. Build a stable economic base and military production before sending the main force to explore chart locations; the Knights of St. John begin a voyage to the New World and face pirates during the journey. A second Town Center is optional, so choose it only if the economy and map position justify the extra construction. Keep the Dock protected once built, since the mission’s sea access is part of the objective and the enemy threat is maritime. Split exploration from base defense: the chart search needs mobility, while the settlement must keep producing workers and troops. Clear guards before collecting a chart and regroup before moving to the next one. Completing structures in a safe order reduces the chance that the player reaches the final chart with no army or ship support to defend the base.