Breakout
Breakout is an Age of Empires III scenario in Act I: Blood (scenario 1), set in 1565. The player commands Knights of St. John.
Scenario setting & objectives
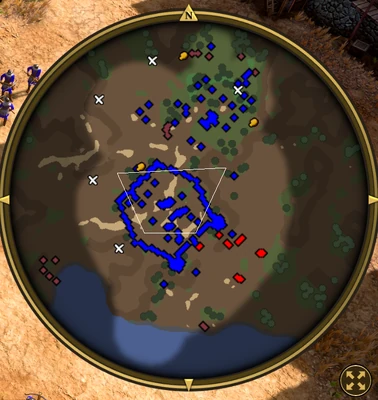
The required goals are Defend the Fort Command Post; Use Settlers to gather the wood on the hill to light the signal fire; Destroy all the Great Bombards. Optional goals include Collect all the treasures on the map.
Mission approach
Secure the named target before committing the whole force elsewhere; keep a mobile reserve near the threatened approach. Scout the target and its approach, then preserve enough of the starting army to finish the required assault. Keep Villager production and resource gathering aligned with the stated threshold; assign workers to the nearest safe source and avoid idle time. Take optional objectives when they add useful allies, routes, resources or reinforcements without putting the primary goal at risk.
Scenario premise and campaign place
Breakout is the opening scenario of Act I: Blood in the original Age of Empires III campaign. Set in 1565, it introduces Morgan Black and the Knights of St. John defending a Maltese fort against the Ottoman force commanded by Sahin the Falcon. The opening cutscene frames the conflict through Sahin’s claim that the Crusades are over and Morgan’s effort to protect the order. This is a scripted campaign battle rather than a standard skirmish civilization matchup. The Definitive Edition identifies the enemy as Ottomans; the original campaign used a British stand-in. Mission-specific units and reinforcements take precedence over normal civilization availability.
Starting position and forces
The player begins with Morgan Black, Pikemen and Crossbowmen defending a walled base. The fort contains Houses, a Barracks and Outposts, while a separate northern economic area provides Settlers, a Market and a Mill. There is no Town Center in the starting economy. The fortified position also contains a decorative Command Post that must remain standing. Starting resources total 1,300 Food, 1,900 Wood and 500 Coin, in stockpiles or crates depending on the setup. These resources allow reinforcements, but the workers and signal-fire objective still need protection. The Home City is unavailable for shipments, so a normal card delivery cannot solve a resource or unit shortage.
Defend, then prepare the signal fire
The scenario opens with Janissaries attacking the fort. Keep Morgan and the starting Infantry near the threatened wall, use the Outposts to extend defensive fire and prevent the enemy from reaching the Command Post. Settlers in the north can gather and support the objective, but the area needs protection. The signal fire is the mission’s key transition: workers must reach and light it, and on Moderate and Hard the Knights begin with the standard four wood piles needed for the task. Do not send the whole garrison to chase attackers while the fort is under pressure. Stabilize the approach, then escort the workers so the allied response can arrive.
Alain Magnan and the final Ottoman assault
After the signal fire is activated, Alain Magnan appears with roughly 16 to 18 Hussars. Alain and his riders join the player and help defeat the Ottoman Bombards. The enemy periodically sends Janissaries and Sipahi from the southwest and can use a Galley to land a small group of Janissaries near the workers lighting the fire. There is no ordinary enemy base to destroy; attackers spawn as part of the scenario. Later, the Ottomans advance with five Great Bombards. Keep cavalry and Infantry ready to engage the guns, and do not leave them free to attack the Command Post. The enemy has fewer units on Easy, so pressure varies by difficulty.
Home City progression and mission strategy
Although Home City shipments and card selection are disabled during the mission, earned experience can still increase the Home City level and is saved for later. A reliable sequence is to preserve the initial defenders, keep enough workers gathering, light the signal fire under escort, then use the new Hussars to strike the Bombards while Infantry holds the approach. Keep a reserve near the Command Post, since a successful cavalry attack can still leave the fort open to another wave. Treasures around the map offer optional rewards, but they should not draw the entire force away from the fire or final defense.
Difficulty and release notes
Breakout’s story and objective belong to Act I: Blood, while faction presentation differs by release. The Definitive Edition uses an Ottoman enemy identity; older material may describe the opponent as British because that faction served as a stand-in. The campaign Knights of St. John are scenario-controlled and do not represent a standard multiplayer civilization. The decorative Command Post and scripted arrival of Alain’s Hussars are mission rules, not general building or shipment mechanics. When replaying the scenario, account for its restricted Home City, scripted reinforcements and difficulty-scaled enemy waves rather than applying a normal skirmish build order.
Protect the workers and fixed objective
The mission divides attention between a fortified base and the northern workers. Keep enough Infantry at the fort to meet periodic attacks, then send a compact escort with the Settlers assigned to the signal fire. The enemy Galley’s landing attack can disrupt workers at the moment they are vulnerable, so watch the shoreline and respond before the Janissaries surround them. The Command Post is decorative but is still a required survival condition; treat it as a protected objective rather than a production building. When the next wave arrives, prioritize units attacking the objective and preserve the Settlers who can complete the signal-fire task.
Use reinforcements against siege weapons
Alain’s Hussars are a powerful scripted reinforcement, but their best target is the Great Bombards rather than the Ottoman infantry screen. Send the cavalry around the edge of the fight, engage the artillery and withdraw if Janissaries or Sipahi begin to surround them. At the same time, keep Pikemen and Crossbowmen close enough to defend the fort and workers. Replace losses from the resources already available, but avoid spending every crate on a force that leaves no defenders at the Command Post. The scenario is won by completing its sequence and holding the objective, not by chasing every spawned enemy to the southwest.
Hold the Malta fort and signal for help
The first Act I: Blood scenario places Morgan Black at a fort on Malta under Ottoman attack. Defend the Fort Command Post, use Settlers to gather the hillside Wood and light the signal fire, then destroy all Great Bombards. Treasures across the map are optional. Keep enough defenders near the Command Post while workers gather Wood; the signal task exposes them outside the walls, so escort the group and return them safely. The Bombards are the major siege threat, so use mobile units to reach them while the fort remains protected. Do not send all defenders after Treasure guardians before the signal is lit. Morgan’s hero abilities support the mission, but the objective depends on both keeping the fort and removing the siege weapons.
Difficulty changes the signal-fire wood
The signal fire uses map wood piles, and the number changes with difficulty: Easy provides two piles, while Moderate and Hard provide four. That changes how long the Settlers must work outside the walls, so scout the hill and clear a safe approach before sending the group. The mission also gives a substantial starting stockpile, but those resource crates do not remove the need to gather the objective wood. Keep enough defenders at the fort while the workers complete the task; lighting the fire triggers the arrival of Alain Magnan and his Hussars.
Five visible treasures and Morgan Black
All five treasures are visible from the beginning and lie around the base: northeast, north, northwest, west and southwest. Collecting all of them is the optional objective and awards 300 Experience. Morgan can explore and claim them while the fort's defenders hold the Janissary attacks, then return before the Ottoman siege grows. Use his Oberhau ability against nearby guardians when needed, but do not leave the Command Post without protection merely to finish the bonus. The route can be split into safe nearby treasures first, with the southwest site approached only when the army can cover Morgan's retreat.
Spend the opening on Crossbowmen
The mission starts with no Town Center, and its initial Coin is enough for the planned defense; Food and replacement troops are more urgent than sustained Coin gathering. Crossbowmen are an efficient answer to the repeated Janissaries, and the rear Barracks can research their upgrade while the fort fights. Although Morgan's dialogue recommends Pikemen against Sipahi, the scenario weakens the enemy Sipahi and they are vulnerable to ranged fire; Pikemen can be lost to Janissaries. Reassign workers toward nearby Deer when the initial food source is insufficient, and preserve some wood for production and the signal-fire plan rather than spending it all at once.