Trust
Trust is an Age of Empires III scenario in Act II: Shadow (scenario 6), set in 1876. The player commands Black Family Estate.
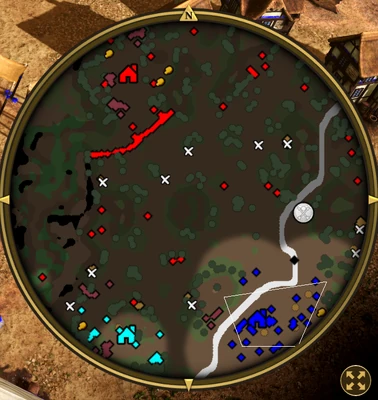
Scenario setting & objectives
The required goals are Earn 15000 Experience points; Find Sheriff Holme. (After the first objective is completed). Optional goals include Earn 300 Experience points for each Lakota warrior prisoner returned to the flagged area in the Lakota village; Earn 2000 Experience points for rescuing the Lakota War Chief and returning him to the flagged area in the Lakota village; Earn 150 Experience points for each outlaw killed; Earn 1000 Experience points for building a Trading Post on the Trade Route.
Mission approach
Use the scenario’s stated experience sources and optional rewards to reach the threshold before the deadline. Scout the route before moving the hero or starting force, and avoid splitting units the mission needs together. Take optional objectives when they add useful allies, routes, resources or reinforcements without putting the primary goal at risk.
Campaign premise and objectives
Trust is scenario six of Act II: Shadow in The WarChiefs campaign, set in 1876. Chayton has one day to prove to the Lakota that Sheriff Holme is responsible for the attacks and to bring him before George Armstrong Custer. The main objective is unusual: earn 15,000 experience, then find Holme once that threshold is reached. The Black Family Estate begins in the southeast with a Town Center, Artillery Foundry, Corrals, War Huts, Houses, and a small starting force. The player cannot train ordinary Villagers. A few Miners can gather coin, but food and wood must come from shipments, rescued Villagers, or resource crates and carts controlled by the enemy. This makes preserving gatherers and choosing fights that pay experience more important than building a conventional economy.
Optional rewards and supporting Lakota
Several optional tasks make the experience requirement easier. Each Lakota warrior prisoner returned to the marked area in the village grants 300 experience; rescuing the Lakota War Chief and returning him grants 2,000. Each outlaw killed is worth 150 experience, and constructing a Trading Post on the Trade Route grants 1,000. The allied Lakota camp lies south of the player's position and has Villagers gathering resources, but the ally will not actively fight for the player. Protect the workers and Miners because they are the only reliable way to sustain unit production. The map contains nine treasures, including additional Settlers, food, and other rewards; nearby treasures can provide a small replacement economy and help the player reach the experience target without sending the army into the most heavily defended northern base too early.
Enemy behavior and terrain
Holme's main camp is walled in the north, with Outposts and a separate group of roaming bandits on the map. The enemy adapts by training units that counter the types the player is producing, so repeatedly massing one unit can make the next engagement harder. Great Plains-like terrain has Bison herds in the north and center, but hunting there is dangerous because the bandits raid those areas. Silver Mines are spread across the map; the player's Miners and any rescued Villagers can use them for coin. Enemy resource carts and crates can be attacked to obtain supplies, but sending gatherers too close to the enemy patrols can cost irreplaceable economic units. Use the starting army to scout the routes, rescue allies, and collect safe resources before challenging the fortified camp.
Building experience safely
Use Chayton and Holme's abilities to thin roaming outlaw groups and protect rescued workers. Rather than waiting passively for experience, keep a steady cycle of safe treasure collection, outlaw skirmishes, prisoner rescues, and unit production. Villagers rescued from treasures or delivered by an available Home City shipment can gather or work at the Community Plaza; Plaza dances can help create troops when normal production resources are scarce. Because the enemy counters the current unit mix, combine ranged infantry, cavalry, and artillery instead of sending an unsupported single type. Establish the Trade Route Trading Post when the area is secure, then continue earning the remaining experience through controlled engagements. After 15,000 experience unlocks the next objective, search the enemy territory for Sheriff Holme and complete the story's confrontation. The sequence rewards economy management and exploration as much as combat.
Resource cycle and final confrontation
At the start, send the army for resource-focused treasures and protect every Miner or rescued Villager; their survival matters more than an early siege. Enemy resource wagons travel near the middle of the map. Destroy them when the army can cover the gatherers who collect the crates, then use the resources to replace losses. The Community Plaza's Fertility Dance can accelerate unit production when workers are available, while Settler shipments or Villagers rescued from treasure sites expand the very small economy. Once the army can defend the Trading Post area, secure the route and research Stagecoach to improve income. Holme's force adapts to the player's composition, so keep multiple unit types and consider aging to the Fortress Age for stronger units such as Falconets. When 15,000 experience is reached, the next objective sends Chayton toward Holme's hideout. Crazy Horse, called Uncle Frank in Definitive Edition, then joins with a large Lakota force. Push through Holme's northern town, follow the path into the caves, and defeat the outlaws guarding him to finish the scenario.
Adapting to the enemy response
Holme's adaptive production means the player should vary the army as the scenario progresses. A single cavalry mass can draw more anti-cavalry troops, while a force built only around ranged infantry may face a different counter. Replace losses gradually and protect the small number of gatherers rather than trading them for a quick attack. The Lakota ally's workers remain passive, so the player cannot depend on the southern camp to defend itself or send troops. Once Holme's main camp is weakened, the bonus army led by Crazy Horse or Uncle Frank makes the final passage into the caves easier, but the requirement is to reach and defeat Holme, not simply burn the northern settlement.
Earn the Lakota’s trust before searching for Holme
Chayton must earn 15,000 Experience before the second objective—finding Sheriff Holme—becomes active. Optional rewards support the total: return Lakota warrior prisoners for 300 XP each, rescue the Lakota War Chief for 2,000 XP, kill outlaws for 150 XP each and build a Trade Route Trading Post for 1,000 XP. These tasks also help the Lakota, so prioritize nearby prisoner and outlaw objectives while keeping the War Chief safe. Once the 15,000 XP threshold is reached, locate Holme rather than continuing to explore indefinitely. The mission’s story asks Chayton to earn the Lakota’s trust before handing Holme over to Custer; the title reflects that political choice as well as the experience requirement. Track the objective counter and do not assume the final search is available from the start.