Chuvash Cape
1582 — Play the Russians in Yermak Timofeyevich’s campaign into Siberia against the Tatar Khanate of Sibir.
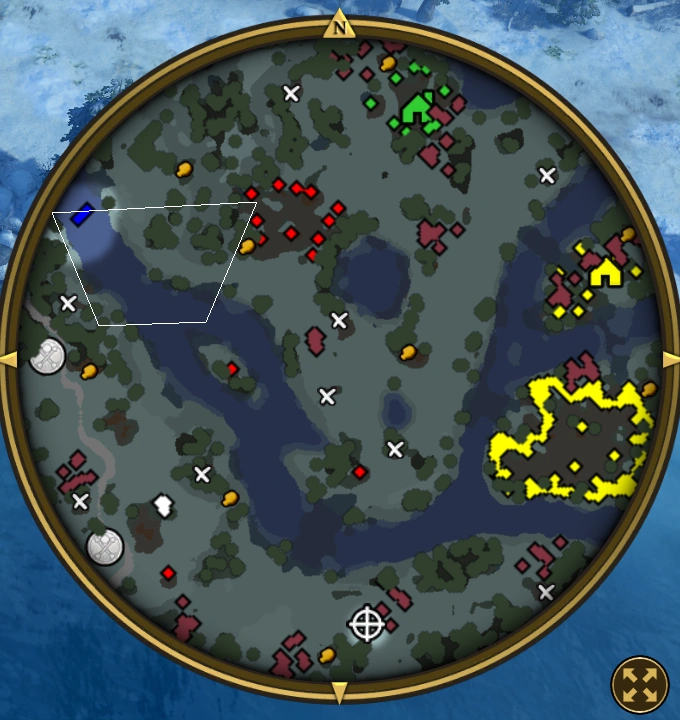
Setting & objective
The required goals are Find a safe location to unload your boats; Travel towards the safe location marked on the map; Build a Town Center to establish your camp; Destroy the Tatar fortress of Qashliq. Optional goals include Protect the Russian village to the north; Destroy the Tatar camp to end their raids; Build a Trading Post in the west route.
How to approach it
Find the marked safe landing before unloading, then establish the Town Center while protecting the boats and workers. The base must be secure before the assault on Qashliq; Tatar raids make a rushed settlement dangerous. Clear the optional camp or protect the northern village when those tasks reduce pressure on the route to the fortress.
Historical battle and mission premise
Chuvash Cape is the third Historical Battle in Age of Empires III: Definitive Edition. Set in 1582, it follows the Cossack ataman Yermak Timofeyevich as his expedition travels along the Tura River and confronts the Tatar forces at Qashliq. The scenario contrasts a small expedition with a much larger cavalry-based enemy and gives gunpowder units a central role. The player is not asked to win one immediate field battle: first navigate the river, land safely, establish a base, protect an allied village, and then destroy the fortress. Its early transport and exploration phase matters because additional resources and Home City shipments make the later defense and siege much easier.
Starting force and resources
The player begins in Commerce Age with 800 Food, 300 Wood, and 300 Coin, a population limit of 200, Yermak, ten Streltsy, two Cossacks, and two Flat-bottomed Boats. The force is split between the boats, so the opening is a navigation puzzle as much as a combat encounter. Yermak is a Dragoon-type Explorer with Bulava Maul, a powerful single-target melee ability, and regenerates hit points while idle on land. He does not regenerate while loaded in a boat. Preserve him as the expedition’s durable front unit: use his ability to draw or eliminate a guardian, while the Streltsy provide ranged support and the Cossacks protect against mounted threats.
Navigate before the enemy can raid the base
The river route contains patrols, towers, cliffs, and narrow landing points. Keep the loaded boat away from banks where ranged cavalry can attack it, and use the empty boat to scout ahead. Exploring before founding the base is valuable because the enemy’s regular raids begin after the settlement is established. The player can collect safe Treasures, reveal the village and future routes, and build shipment experience before that pressure starts. Do not treat the voiceover about continuing on foot as a requirement to immediately abandon the boats; the boats remain useful for scouting and repositioning until the marked landing is chosen.
First landing and campfire treasure
At the beginning, land near the northeastern side of the river, gather the troops together, and consolidate them into one boat so the other boat can scout. Near a campfire on the southwestern bank, three Keshiks guard a landing. Put Yermak ashore first and use Bulava Maul on one enemy; his durability can draw attacks while the Streltsy and Cossacks unload to finish the group. Tigers guard a nearby Treasure that raises Yermak’s hit points by 30%, bringing him to 1,300 in the scenario profile. Allow him to recover before continuing, then reload the troops. Using Yermak as the first contact prevents the fragile expedition from taking avoidable damage.
Follow the south fork and protect the boats
Continue downriver through the south fork and keep close to the southwestern side when the river divides. Towers and troops watch the island and cliffs, so use the lead boat to reveal danger and avoid drifting toward the enemy banks. Near a southwestern opening, three Keshiks guard an unguarded 150-Wood Treasure. Land as far south as possible to avoid the troops on the northern cliffs, send Yermak in first, and bring the Streltsy and Cossacks in after he has drawn the defenders. Reload once the area is clear. The Wood is valuable later for Houses, Blockhouses, and the economy, so these early rewards directly support the base phase.
Explore the inlet before triggering the settlement
Before entering the marked landing zone, explore north into the inlet around the northeastern peninsula. A 75-Wood Treasure is guarded by two Tigers, while a tower and Tatar cavalry watch from the southeast. Save before attempting this route because patrols can cut off the landing. Use Yermak to engage one Tiger at a time and keep the Streltsy in a stationary defensive stance so they do not wander toward the tower. Farther east, a 300-Wood Treasure is guarded by two Thuggees and three White Tigers. Draw enemies away in small groups, use Yermak’s ability on a Thuggee, and bring the ranged troops in only when the approach is safe.
Reach the Russian village and secure its reward
The Russian Village lies north of the lake and contains a Town Center, Blockhouses, Villagers, and Streltsy. It is an ally, and protecting it becomes a secondary objective that reduces attacks from the north bank. Its surviving economy and military can later support the player with resources and troops. Do not move directly through the Tatar camp to reach it; the eastern and western approaches are watched by cavalry and towers. A 100-Wood Treasure guarded by two Polar Bears lies to the east along the village. Use Yermak to handle one guardian, withdraw while Bulava Maul recovers, and repeat. The village is worth scouting before establishing the player’s own Town Center.
Use safe routes and avoid patrol triggers
The map has additional guarded Treasures, including one with 205 Food behind ten Snow Monkeys and another guarded by two Snow Monkeys near the lake. The larger group is safer to clear with Yermak drawing attention while Streltsy and Cossacks assist. Keep to the shore when moving near the flag that triggers the landing objective; approaching too early can start the base sequence before exploration is complete. A large Tatar cavalry patrol moves through the shallows, so avoid approaching from the southeast and watch for patrol timing. Rest Yermak before the final trip to the flag; his health and ability are important for the first raids.
Found the camp away from the shallows
Once the Streltsy reach the marked flag, five Villagers and a Town Center Wagon join the expedition. Place the Town Center near the indicated safe area but away from the shallows, where Tatar attacks arrive. Task the new Villagers to Food so the economy can maintain worker production and military queues. Completing the Town Center brings five additional Villagers, raising the population to roughly 22 of 25, so build Houses promptly and use them as partial barriers. The opening is a timing shift: the enemy raids become active, and the player must defend the new base while continuing to develop the expedition’s military and secondary objectives.
Build a layered defense and use the shipments
Put a Blockhouse or two near the shallows to cover the approach, add Houses for population and partial walls, and keep a production building ready for reinforcements. The scenario’s early Treasures supply extra Wood for these defenses. Send resource crates and worker or livestock cards once the Town Center is active, while maintaining Villager production. The shipment deck includes Food, Wood, and Coin crates, Sheep with a Homestead Wagon, military units, Blockhouse support, and artillery. Use cards according to the pressure: resources stabilize the economy, while troop shipments answer a raid that cannot wait for normal training. Save the Homestead Wagon for an Estate in Fortress Age if following the source strategy’s economic plan.
Counter the Tatar cavalry
Both the red Tatar raiders and the yellow Qashliq force rely heavily on cavalry, including Steppe Riders, Cavalry Archers, Keshiks, and Meteor Hammers. Rekruts and Poruchiks are useful counters, while Streltsy can support them from behind. Cavalry Archers are an alternative if the player prefers a mobile response. Do not invest the whole army in slow infantry without positioning; the enemy can attack from multiple directions. Use Villagers and Yermak’s scouting to identify the approach, keep counter units near the shallows and village, and send the rest to clear the western area. A Church’s Westernization can upgrade Russian troops to Veteran and may save resources compared with separate military-building upgrades.
Protect the northern ally and complete its objectives
The Russian Village is not just a passive landmark. Keeping it alive reduces northern raids and allows its economy to contribute units and resources. Build a Blockhouse near the village and station enough Rekruts, Poruchiks, or Streltsy to respond when cavalry approaches. A Home City Town Center shipment and additional Blockhouse support can reinforce this position if the main base is stable. The secondary objective to destroy the Tatar camp southwest of the village can remove another source of pressure. Coordinate the attack with the ally’s units rather than sending the player’s entire force away from the Town Center, which remains vulnerable to attacks from the shallows.
Clear the western resources and Trade Route
The west contains a tower, scattered Tatar groups, cavalry patrols, and additional resource sites. A force of roughly forty infantry with a couple of Priests can clear the area more safely than a small raiding party. Check the cliffs and approach from the edge to avoid leaving small enemy groups behind the army. Heavy Cannon, Falconets, or Mortars from shipments can help remove towers; Mortars are useful when defenders lack infantry or enemy cannons. Once secured, the western area provides two Trading Posts, five Goats, two mines, a herd of huntables, and additional Wood. These resources support the long siege and give the player more room to maintain population and production.
Advance and prepare the fortress assault
After the western area is secure, choose whether to fortify near the northern shallows or combine forces with the Russian Village to destroy the Tatar camp. The latter can create a stronger joint army and open a route toward Qashliq. A Fortress or Blockhouse near the shallows helps protect reinforcements, while a forward Fort can support production outside the enemy base. Age to Industrial when the economy can sustain it; Heavy Cannon shipments can destroy towers and help break the fortress defenses. Falconets and Mortars are also useful, but keep anti-cavalry infantry between artillery and the enemy’s mounted force.
Attack Qashliq from more than one direction
The Tatar fortress has a Town Center, Villagers, and cavalry including Steppe Riders and Tatar Archers. Approach with a population-ready army and enough artillery to damage buildings efficiently. The northern shallows near the Polar Bear Treasure lead to another Tatar Town Center and offer a second route toward the main base. Clearing the Tatar camp and opening the northern approach can let the player attack from east and north at once, splitting the defenders. Keep Heavy Cannons, Falconets, or Mortars protected and use infantry counters to hold cavalry away from them. Continue replacing losses from the player’s base or the Russian Village until the main fortress is destroyed.
Mission checklist and completion
The primary tasks are to unload the boats at a safe location, travel to the marked site, build a Town Center, and destroy Qashliq’s fortress. Secondary goals are to protect the northern Russian Village, destroy the Tatar camp, and build a Trading Post on the western route. A stable solution handles these in a practical order: explore and collect safe resources before triggering raids, establish a defended base, secure the ally and western economy, then assemble counters and artillery for the final assault. The scenario can be completed without clearing every patrol, but optional objectives reduce pressure and provide a stronger position. Keep the Town Center producing Villagers and maintain a route for reinforcements throughout the siege.
Manage shipments and population during the siege
Early Treasure experience can provide several shipments before the main raids become severe. Spend them in sequence: crates and workers stabilize the base, counter cavalry reinforces the Blockhouse line, and artillery supports the fortress assault. Keep population space for incoming units and finish Houses before the Town Center is full. Avoid sending an expensive military card while the army is away clearing the west unless the base is under immediate attack.
Use objectives to reduce pressure
The Russian Village defense and Tatar camp objective change how often and where the enemy attacks. Completing them can provide allied support and open another direction, reducing the need to hold every approach with the starting force. Secure a route to the village before splitting the army, and leave enough defenders around the player’s Town Center. The main objective remains Qashliq; optional goals are useful when they make that final assault safer.
Land safely, establish the camp and approach Qashliq
The Historical Battle recreates Yermak Timofeyevich’s 1582 advance against the Khanate of Sibir. The primary sequence starts with finding and reaching a safe unloading site, then building a Town Center before attacking the Tatar fortress of Qashliq. Do not land the entire force at an exposed shore simply because it is the shortest route; secure space for the first units and the builders first. The optional northern Russian village, Tatar raiding camp and western Trade Route site provide distinct benefits: protect an ally, reduce pressure from raids or secure route value. Complete the tasks that stabilize the map before assembling for the fortress assault. Keep the Town Center and its economy safe while the army moves forward, and maintain a return path for reinforcements. Since this battle is an Age of Empires III Historical Battle, use its scripted starting conditions and objectives rather than importing a standard random-map opening.
Stage the landing before building the Russian camp
The Historical Battle recounts Yermak Timofeyevich’s 1582 campaign against the Khanate of Sibir. The player must find the marked safe landing site, unload the boats, travel there and build a Town Center before attacking Qashliq. The optional northern village, Tatar raiding camp and western Trade Route provide different strategic benefits. Protect the landing party until it reaches the marked site, then keep builders covered while the Town Center is established. Removing the raiding camp can reduce pressure on the new base; protecting the Russian village preserves an ally; the western Trading Post adds route control. Choose these tasks according to the army’s available strength, then gather siege support for the Tatar fortress. The mission is a staged expedition from water to land, so a safe beachhead matters more than landing as quickly as possible in an exposed area.