Company Confrontation
Company Confrontation is the fifth and final scenario of Act III: India in The Asian Dynasties. Set during the 1857 Battle of Jhelum, it brings Nanib Sahir’s campaign to a confrontation with Colonel Edwardson and the East India Company.
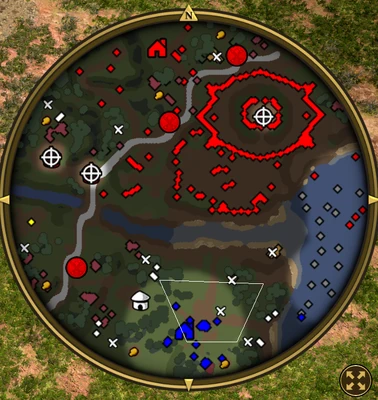
Scenario setting & objectives
The required objective is to destroy the Company Command Post. Optional goals can weaken the Company before the assault: destroy the northeast Docks and western Mills, clear its Trade Route, gain support from native resistance fighters, remove Trading Posts on saltpeter sites, capture the Fort’s Fixed Guns, and prepare for Edwardson’s incoming army. These options open economic and military advantages, but only the Command Post is required.
Mission approach
Scout the approaches and decide which optional objectives your starting force can complete without losing tempo. Secure local support and useful guns before Edwardson’s army arrives, keep a reserve near your base, then concentrate the attack on the Command Post rather than scattering the whole force across every optional site.
Final mission of Act III: India
Company Confrontation is the fifth and final scenario of Act III: India in The Asian Dynasties. Set during the Indian Rebellion of 1857, it follows Nanib Sahir and Pravar Patel as they move from Delhi toward Shimla with Bahadur Shah and seek Colonel Edwardson. The primary objective is to destroy the British India Company's Command Post, worth 10,000 XP. The mission begins with a functioning Indian settlement in the south, then turns into a defense against timed Company attacks before opening into a campaign across the map. Its conclusion has the player seize the Company's fortified position and use the captured Fixed Guns against the Command Post.
Starting settlement and early economy
The player begins with Nanib, Pravar, five Sepoys and two Mahout Lancers, together with a Town Center, Barracks, Houses and Hindu Villagers already divided among Food, Wood and Coin. Water Buffaloes near the base can be assigned to a Sacred Field, and a Bhakti Temple holy site lies nearby. Preserve the starting units while the economy continues to work; the mission's timed attacks begin before the player has cleared the whole map. The initial mix already has mounted power and Sepoys that can help against Cavalry, but a second defense layer will be needed for the heavier waves. Collect safe treasures near the base and prepare production before using the army to explore distant objectives.
Timed attacks and defensive composition
A countdown at the top of the screen warns when the Company will attack. The first wave centers on Imperial Hussars, so prepare anti-Cavalry units such as Sepoys and Zamburaks and avoid leaving Villagers exposed. Later waves are substantially larger and combine Musketeers, Rockets, Hussars and Dragoons. The first major force includes Musketeers and Rockets; another then approaches from the left with Hussars and Dragoons, threatening Sowars and siege units. The later small Musketeer group can also strike from that side. Keep a mixed force around the settlement and avoid placing all artillery or cavalry in the path of the incoming guns. After the attacks, replenish the army before moving toward the saltpeter sites.
Use the Consulate and Sacred Field
The Ottoman Allies Consulate option can provide Great Bombards, which help against the Company's defensive structures and fortified position. This is a strategic choice rather than a required objective, and the player still needs troops to defend the bombards from Cavalry. The Sacred Field gives nearby Water Buffaloes a productive role and helps the economy sustain military production. The map also has huntable Wild Elephants and Nilgai, Ashoka and Eucalyptus trees for Wood, and fish near the water. Company ships, mainly Caravels with some Frigates, control the water, so the fishing area is unsafe until the navy is cleared. Choose land resources first if the fleet cannot yet be challenged.
Secure trade and saltpeter sites
Several secondary objectives improve the player's position. Clearing the Company's vital Trade Route is worth 1,000 XP, while destroying the Trading Posts at the saltpeter sites yields 3,000 XP. Those sites also generate crates of Food, Wood and Coin, making them important for the army as well as the score. Locate native resistance fighters for another 1,000 XP and destroy the northeastern Docks for 1,000 XP if the player can safely reach them. These tasks reward expansion after the attack waves, but each requires moving away from the original base. Establish a secure route across the central river and protect the newly claimed sites so the Company cannot interrupt the resource flow.
Prepare against Edwardson's counterattack
One secondary task asks the player to prepare defenses and destroy Edwardson's incoming army, rewarding 5,000 XP. The central river can help divide the map; Castles placed along it can defend crossings and discourage small raids while the army operates on both sides. The fixed objectives and enemy waves make it risky to leave every defensive structure behind at the original colony. Keep anti-Cavalry units close to siege engines and guard the route between the base and saltpeter sites. Capturing the Fort's Fixed Guns is worth another 1,000 XP and provides heavy firepower for the final assault. Destroying the western town's Mills is also an optional 1,000 XP objective.
Advance through the Company settlements
After the saltpeter positions are secured, the Company's outer settlements become easier to attack, with only small groups such as Elmetti, Musketeers and Rockets defending some areas. Destroy the Mills in the western town if pursuing that objective, and clear structures that threaten the route forward. The Command Post is protected by durable walls and a final force, so do not send siege units ahead of the army. Once the Fort and its Fixed Guns are captured, use the guns to break the inner defense and attack the Command Post. Colonel Edwardson is found within the fortified position. The campaign's primary completion condition is the destruction of the Command Post; the optional objectives provide additional XP and advantages, but they do not replace that goal.
Alternative base and map control
The Company waves are directed toward the player's original base, which creates an alternative approach: relocate west and establish a new position. The starting resources include enough Wood to build a Town Center, and this route can make it easier to secure a nearby level-two Trading Post site on the Trade Route. A western base can reduce exposure to the waves, but it also changes the logistics of defending the original settlement and completing the objectives. If using this approach, preserve enough units to clear the route and establish defenses before moving Villagers. The standard southern base remains viable when the player prepares against the attack timer; choose the layout that lets the army protect the economy and advance toward the saltpeter sites.
Treasures and the final assault
Ten treasures are scattered around the player's colony, the Bhakti Temple, the central and northern Trading Posts, and the western part of the map. Nearby treasures can help the opening, while distant ones should wait until the Company waves are under control. The map resembles Deccan in its wildlife and tree types, but includes water with a hostile fleet. Once land control is established, destroy the ships to reopen access to fishing. Before assaulting the Command Post, gather the army near the Fort, capture its Fixed Guns and bring protected siege units. Take down the walls first, then eliminate the defenders and direct the guns at the Command Post. This completes the final scenario and brings the act to its campaign ending.
Break the Company’s supply network before the final assault
Company Confrontation closes Act III: India with a broad attack based on the Battle of Jhelum on July 7, 1857. Destroy the Company Command Post as the primary objective. Optional tasks can weaken the Company across the map: remove its northeastern Docks, clear the Trade Route, enlist Native resistance, destroy Trading Posts on saltpeter sites, prepare defenses against Edwardson’s incoming army, capture the Fixed Guns and destroy Mills in the western town. These goals affect different parts of the opponent’s economy and defenses, so choose those that support the final approach. Secure the base before preparing for Edwardson’s army, then move the main force toward the Command Post. Avoid dividing the army among all optional objectives at once; preserve enough strength to finish the primary target.